
| The World Models Bard - Poetry In Motion? |
In the Beginning…
 After
flying my trusted FVK Mini ASW-24 for three years, I felt it was time for
a change. Looking to see what was on the market as regards to scale gliders,
lead me to see some beautiful semi-composite and fully composite machines
during my web searches. I decided that something with around a 2-metre span
would be idea for transport purposes…yet the marketplace seemed to
be full of models of 3 metres or more.
After
flying my trusted FVK Mini ASW-24 for three years, I felt it was time for
a change. Looking to see what was on the market as regards to scale gliders,
lead me to see some beautiful semi-composite and fully composite machines
during my web searches. I decided that something with around a 2-metre span
would be idea for transport purposes…yet the marketplace seemed to
be full of models of 3 metres or more.
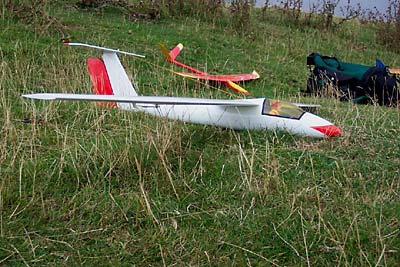
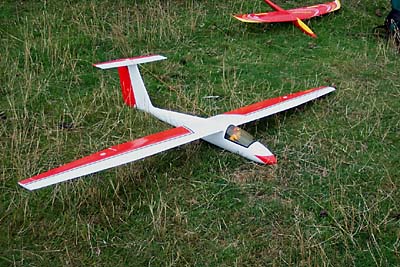
I first spotted the Bard in an advert a year or two back, and noticed its loose resemblance to the full-size Pilatus B4. All regulars to the FS Forum will have read my correspondence with Steve Webb, of Steve Webb Models, and story of their World Models shipment from China, so on July 28th, I drove up to Steve's shop located in Frodsham, Cheshire…to collect my new mount.
What
do you get?
On opening the modestly sized box, you are first greeted with the instruction
manual, decal sheet and beautifully pre-covered (foam/veneer) wings and
tail plane. On removing these, and then removing a corrugated insert,
you'll find the extremely well moulded and painted, glass fibre fuselage.
Various plastic bags contain all the fixtures and fittings (more on these
later).
Being an ARTF, the model requires a minimal amount of time to construct. As this model is aimed at the intermediate pilot and beyond, the instruction manual's diagrams are very easy to follow. It must be said though, that the photos used must have been taken using an early production kit, as my newer model differs very slightly in a couple of areas. Not a complain, just an observation.
The radio gear used for this model is:- 2 x Futaba S148's, 2 x Hitec HS-125MG's, 1 x Multiplex Pico 4/5 Rx and a 1000mAh, 4.8v battery supplied by Multicell.
 Let's
get building!
Let's
get building!
Tail plane
This sits on top of the fin, and is held in place by a single screw. With
the elevator removed the Mylar hinges were secured in place with a small
dab of superglue.
One bit of advice here, is to check the hinge slots have been cut deep enough, on all flying surfaces.
Once the hinges had cured, the elevator was lined up and pushed onto the tail plane. Once square, another few dabs of superglue have the elevator held in place!
The small horn supplied in the kit for the elevator, hadn't been cut properly, and needed to be trimmed down to stop it fouling the rudder post. A small amount of carving with a scalpel soon cured this.
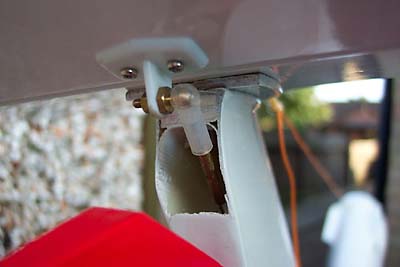
My
main gripe on this area, was the supplied Bowden cable used to activate
the elevator, was a tad too short, and also seemed to bind within its
plastic out sleeve. A length of 22swg was used instead, and was found
to be a lot smoother in operation. The kit supplied plastic clevis was
discarded, and a small ball joint was used to actuate the elevator instead,
see photo above.
Wings
There isn't much to report on these!. Servo lead extensions were soldered
onto the "125's" prior to gluing them in place. The ailerons
were attached like the elevator, making sure of clearances at each end,
then it was just a case of making up the pushrods and fitting the horns,
then finally trimming and fitting the plastic servo covers………the
jobs a good un'!.
Fuselage
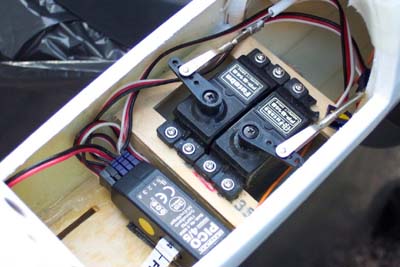 The
wooden bracings holding the pushrod outer's were removed, as they didn't
align with the rudder and elevator servos properly. Both "148"
servos fit a treat, and after 1.5mm mounting holes were drilled, were
secured in place with screws.
The
wooden bracings holding the pushrod outer's were removed, as they didn't
align with the rudder and elevator servos properly. Both "148"
servos fit a treat, and after 1.5mm mounting holes were drilled, were
secured in place with screws.
A small plywood tray is supplied to sit the chosen receiver and battery on. This was epoxied into place, and left to cure. The Rx is held in place with Multiplex Velcro…so much stronger than the standard stuff, yet it allows for the Rx to be removed at any time.
Attention then focused on fitting the rudder. Slots need to be cut into the rudder post, prior to fitting the Mylar hinges. Again, after checking for alignment, this was done very quickly. The kit supplied rudder pushrod seemed to be a bit too stiff in its plastic casing. Even after cleaning with SP30, and a coating of Teflon spray, it was still the same. Instead, I sourced a length of 18swg piano wire from Peterborough Model Centre. This slid very freely, yet is still strong enough to resist any flexing under load.
Electrics. With all the electrical bits mounted, testing was carried out. The throws were adjusted to what I felt looked right.
Flying
As usual, the initial test flight took place at Burrough Hill. The conditions
that day though, were far from ideal (8 to 10mph, NNW). A flight of about
45 seconds took place before I lost out, and landed with a thump. The
fuz had taken the shock loading well, with only a couple of minor cracks
in the paint. The skin on the rudder post had split slightly, but was
soon sorted with a dab of Cyano.
The next testing session happened just over a week later. The wind was much stronger this time (15 to 25mph), but again, still coming from the North. The turbulence was horrendous as the wind was rolling over the trees, but I decided that I was going to give the Bard a throw.
 It
must be said, that she needs a good push out, or else she'll sink! I fought
very hard to make headway, and it paid off after a couple of minutes,
as I broke into some cleaner air. With the C/G set as per instructions,
a C/G test was performed at height…with no dramas.
It
must be said, that she needs a good push out, or else she'll sink! I fought
very hard to make headway, and it paid off after a couple of minutes,
as I broke into some cleaner air. With the C/G set as per instructions,
a C/G test was performed at height…with no dramas.
Even in a very lumpy sky, the Bard was very stable, with crisp controls. After about two or three minutes, some aerobatics were tried…loops…rolls…stall turns, effortless! There was a lot of weak lift around, but all the same the Bard sniffed it out, and would climb very gracefully. After my 15 min buzzer started, I prepared myself for landing.
The Bard came in quite rapid, and curled in for a "Bomber Command" style approach. With her nose into wind, she behaved really well, with no intentions of tip stalling at low speed…. impressive, even in bad air! The final touchdown was a total non-event!
Conclusions
What can I say? I'm really impressed at the quality of this kit, and the
ease of which it goes together. She's very pretty, and has the feel of
something a lot more expensive.
The Bard needs at least a 15mph blow, minimum. In good air, this model is going to be totally delightful, smooth and a joy to watch. At just over 2 metres span, she'll fit in most cars with ease, and her pretty looks will appeal to those who are looking for something of a scale nature.
Controls are responsive, and precise……….ideal for getting out of sticky situations! Even after just one 15-minute flight, I already feel at home with the Bard.
Well done, World Models! A cracking model, for pennies!
My rating? 99 out of 100!
The World Models Bard is distributed in the UK by:
Steve
Webb Models
80 Church Street
Frodsham
Cheshire
WA6 6QU
Tel:: 01928 735225 or 735252
Fax: 01928 735410
Or Online From:
www.servoshop.co.uk
| Technical Details - World Models Bard | |
| UK Distributor | Steve Webb Models |
| Aircraft Type: | Semi Scale Glider (ARTF) |
| RRP | £99.99 (plus P&P) |
| Wingspan | 80.0 in / 2030 mm |
| Wing Area | 409 sq in / 26.4 sq dm |
| Wing Loading | 14.8 oz/sq.ft / 46g/sq.dm |
| Weight | 2.6 lbs / 1200 g |
| Fuselage Length | 36.5 in / 925 mm |
| Number of Channels: | 3 channels,4 servos |
| Control Functions: | Rudder, Elevator, Aileron |
| Construction | All built up wings and tail plane, covered in real heat shrink covering. A ready painted and finished epoxy glass fuselage |
| Likes | Dislikes |
|
|
Please
mention 'Flying Sites' when contacting
Steve Webb Models
&
www.servoshop.co.uk
| Info Panel |
|
WM
Bard
UK Distributor Steve Webb Models Frodsham Cheshire |
| Comments: With her nose into wind, she behaved really well, with no intentions of tip stalling at low speed…. impressive, even in bad air! |
| Price: £99.99 + p&p |
| See Technical Details Below |