
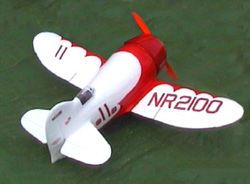
| Gee Bee R1 Park Flyer From Fan-Tastic Models |
Flying Sites Editor
(Unfortunately this company is no longer trading)
 The
Gee Bee R1 and R2 have to be two of the most unusual aircraft of the 20th
century! Designed by the Granville Brothers (hence the name Gee Bee) in
the early 1930's, these tubby little aircraft took the aviation world by
storm.
The
Gee Bee R1 and R2 have to be two of the most unusual aircraft of the 20th
century! Designed by the Granville Brothers (hence the name Gee Bee) in
the early 1930's, these tubby little aircraft took the aviation world by
storm.
On September 5th 1932, in the hands of Jimmy Doolittle, the Gee Bee smashed the World Air Speed record with a blazing 294.38 mph. Doolittle then went on to win the 1932 Thomson Trophy Race in front of 50,000 screaming fans.
But these little aircraft had an awesome reputation in other ways. Some pilots could not handle these twitchy fast flying machines, and several pilots died in spectacular crashes. This reputation has lived on, even in the modelling world. When I first presented this new park flyer from Fan-Tastic Models to my club mates, several of them took a sharp intake of breathe, suggesting to me that the model may well be a handful! Well, lets see!
Fan-Tastic Models of Southlake Texas have already had great success with their F-86 Sabre and Russian Mig15 indoor/park flyers for miniature electric ducted fan. Their latest offering takes you back to the heyday of American Pylon racing and the closed course battles in the skies over America in the 1930's.
The
Kit
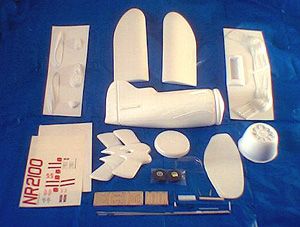 The
kit arrived on my doorstep within four days of ordering it! The small,
lightweight but sturdy box was eagarly unwrapped to reveal the well protected
contents.
The
kit arrived on my doorstep within four days of ordering it! The small,
lightweight but sturdy box was eagarly unwrapped to reveal the well protected
contents.
The Gee Bee's fuselage has been uniquely moulded in extruded polystyrene foam, as have the wing panels, and stabilisers. Other part such as the cowling and wheel/undercarriage pants are made of high-impact polystyrene vacuum formed parts.
Also included are very lightweight sponge wheels, other accessories include pre bent elevator joiners, pre bent undercarriage wires, light weight wire and tube push rods, aileron torque rods and a complete and a very accurate set of 3-colour stickers for historical accuracy.
Not included in the kit of course, is the radio gear, and the recommended GWS electric motor. Fan-Tastic recommend the use of the GWS IPS Twin 'A' RXC 7.2V. This twin uses two of the familar GWS 150 electic motors driving a single 'A' sized gear. However, this motor is not readily available in the United Kingdom.
But after quick trawl over the Internet I found a great site that supplies every GWS motor and spares that you've never seen in the UK! Aero Micro (www.aeromicro.com) in the USA take online orders, and they had the appropriate motor and a selection of props winging their way over to me, again within four days! This is the way all e-commerce should be done. Great online service! Various glues, paint and tape are not included in the kit.
The Gee Bee requires 3-channel lightweight radio, operating elevator, coupled aileron/rudder and throttle via a 3 to 5 amp Electronic Speed Controller. I used two 9g servos and Multiplex Pico-Line radio. You can of course get receivers and servos that are a lot lighter than these.
The instructions are very well written, by modellers it would appear, who know exactly what the builder wants to find out during construction. Complementing the instructions are fully illustrated photographs that help to keep the assembly simple and very quick.
 Let's
Start Building!
Let's
Start Building!
The first job in the building process is the removal of the underside
of the fuselage. After carefully finding the moulded marks on the fuselage
this hatch is cut out with a very sharp knife. The piece that is removed
has a battery bay added to it and then is put to one side until required
for the underwing access hatch.
Once this is done, some carefully trimming of the cowling and wing fairings is required.These are made from vacuum formed parts, so I used a small pair of curved nail scissors for this job, finishing them off by carefully sanding with some smooth grade of 'wet & dry' paper.
The inner front bulkhead resembles a small pie pan, and when trimmed is glued up inside the fuselage behind the firewall.
Glues
I must mention at this point that the instructions refer to glues by their
U.S. brand name. Most gluing jobs are done with RC-56 glue, foam safe
medium cyano and 'Gluit' by Pica, plus a small amount of 5-minute epoxy.
The U.K. equivalent of RC-56 is the readily available RC Modellers Glue.
The closest I could find to 'Gluit' is a foam safe contact adhesive such
as Solvent Free Bostick All Purpose Adhesive. But do test all glues first
on some scrap pieces of foam!
 Motor
Mount
Motor
Mount
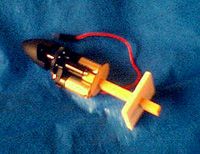
The GWS motor is mounted on a hardwood motor stick, which is slotted through
the bulkhead via a plywood disc mount. Inside the fuselage a piece of
spare foam is cut to receive the motor stick and to adjust the side and
down thrusts of the motor.
The model only need a little bit of down and right thrust and the instructions do point out that it's not critical! Once the motor is lined up then epoxy the motor stick solidly in place.
Wings
Moving onto the wings and these come in two moulded halves. Find the two
long supplied wooden dowels, as these will become the leading edge spars.
Wrap a piece of 180-grit sandpaper around one of the dowels so that you
can sand groove into the underside of each leading edge. Once this is
done on both wing halves you can glue the dowels to the wings. Remember
to leave an inch of dowel unglued at the inboard edge of each wing to
allow the fixing of a small pre-bent aluminium tube wing joiner.
When the dowels have been glued in place you can then trim up the out board ends to the profile of the wing. The wing halves are then joined with RC Modellers Glue or 5-minute epoxy. The joint will give you the right amount of dihedral but do check for the recommended 2 inches under each tip.
 Undercarriage
The trickiest part of the whole build I found was that of the landing
gear. This is made up of a foam outer shell and an inner styrene layer
for added strength. Carefully cut out the four inner styrene halves and
glue them together with cyano, while at the same time inserting four pre
bent piano wires. Make sure that you make right and left handed units!
White plastic tube wheel axles are then trial fitted, making sure that the wheels turn freely. The outer foam shells can then be trimmed to shape and fitted around the undercarriage units. They are quite a tight fit and some careful trimming of both the inner and outer units is needed to get a perfect fit.
Don't be too discouraged by the above, as the instructions will guide you through the process with good photographs and a well written description of what to do.
Painting
 The
instructions recommend at this point that you spray the familiar red scalloped
design. To help with this Fan-Tastic Models have provided masks on several
sheet of paper.
The
instructions recommend at this point that you spray the familiar red scalloped
design. To help with this Fan-Tastic Models have provided masks on several
sheet of paper.
By cutting out the masks and placing double side tape to them you can spray the correct design on the model. Do be carefully with the double-sided tape though. In spite of rubbing the glue side of the tape with my fingers, to lessen its 'grab' I still had a few problems removing the masks after spraying.
Do test your paint on a scrap piece of foam before spaying. Use a foam friendly paint such as Humbrol enamel from a spray can or use the Tamiya 'colours for plastic'. Don't use any cellulose based car sprays or you will end up with large melted gooey mess!
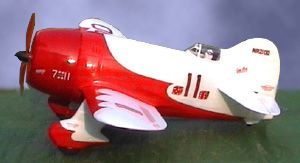
The model also comes with its very own Jimmy Doolittle, moulded in plastic. Once he is painted you can then mount him, the dashboard dials and the clear acetate canopy onto the model. Despite its small size, this model is very accurate and very detailed!
 Under
The Hatch
Under
The Hatch
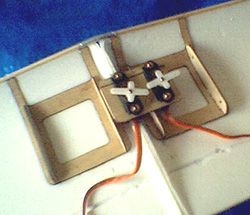
The 'heart' of the machine is mounted on the underside centre section
of the wing. Here will be placed the undercarriage attachments, servo
mountings and various push rods and aileron torque rods.
These mountings are made from a selection a laser cut plywood parts that slot together very quickly. Once cyanoed together the units are then epoxied to the under side of the wing. Once again clear photographs and text guide you through the construction.
After
cutting out the ailerons and re-attaching with clear 'Magic Tape' the
torque rods are added and the provided 1/32nd piano wire push rods are
cut to length. A 'V' is bent into these rods to allow for trim adjustments.
The wing and fairings are now glue in place. A push rod is also fitted
to the right aileron torque rod horn. This couples the rudder to the ailerons.
 Tail
End
Tail
End
Moving to the back end now. Cut out the slot to accept the horizontal
stabiliser and cut the horizontal stabiliser to shape, removing the elevator
at the same time. Once the elevators have been rejoined to the stabiliser
with 'Magic Tape' the pre-bent elevator wire joiner can be added as is
the laser cut ply wood elevator control horn.
You have to be careful while fixing the stabiliser as you have to insert the control push rod down the fuselage making sure that it exits under the main wing (by its servo) and ensuring that the stabiliser is correctly aligned and level! The rudder has an internal horn to accept the push rod from the aileron torque rod. This too can be a little fiddly.
All that remains is to attach the Velcro strap to the battery bay, put on the 'tail wheel' (vacuum formed plastic) The receiver and electronic speed controller slot into the gap left between the leading edge of the wing and the back of the bulkhead. Attach the battery bay/underside hatch with tabs of spare foam.
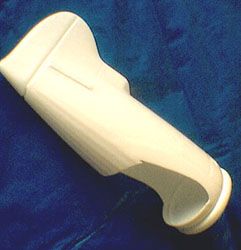
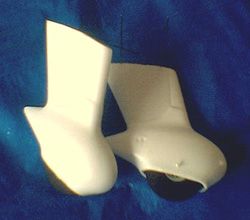
 The
cowling can has moulded engine details and this can also be painted to
represent the Pratt & Whitney engine. The cowling is a friction press
fit on the bulkhead of the aircraft and will not come off in flight!
The
cowling can has moulded engine details and this can also be painted to
represent the Pratt & Whitney engine. The cowling is a friction press
fit on the bulkhead of the aircraft and will not come off in flight!
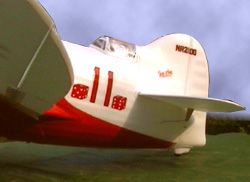
Finally cut out the superbly detailed sticky backed decals and place them on the model as shown in the photographs at the end of the instructions. You can also do a little extra research on the Internet as I did. This turned up several sites with loads of detailed photos of the full size Gee Bee R1. By the way the Gee Bee R1 was numbered 'Eleven' and the identical Gee Bee R2 was numbered 'Seven', hence the famous 7-11 logo on the nose of the aircraft.
Flying
Fan-Tastic recommend the use of an 8-cell 150mAh NiCad flat pack battery.
Use the battery pack to balance the model on the recommended centre of
gravity. This is 1 & 5/8th of an inch back from the leading edge.
If you have built the 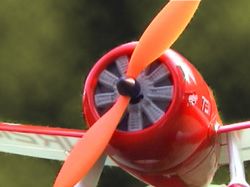 model
as lightly as you can then the balance point should be pretty close. The
all up weight of the model should be 12ozs. Mine came in at 13ozs.
model
as lightly as you can then the balance point should be pretty close. The
all up weight of the model should be 12ozs. Mine came in at 13ozs.
All movements are stated as 3/8th inch up, with a little less down movement. I found that I had to increase the up elevator movement a little, but it all depends on how you fly. I like a slightly more responsive elevator than others.
For the first flight I used the GWS recommended propeller for the motor. This was an 11x4.7. I should have read the Fan-Tastic Models instructions more carefully as they recommend a 10 x 8! The model took off with a little swing to the left. This was corrected with some right aileron; not too much, just enough to get that coupled rudder to bite. There after it was a bit of a struggle to keep the model flying. I used lots of elevator, but that just scrubbed off any speed I had gained! Before I knew it the 150mAh NiCad battery pack was flat and I had to bring her in.
Right! Lets get that 10 x 8 prop on the model. This time I used a 300mAh Nickel Metal Hydride 8 cell pack. This was about the same weight as the 150 NiCad pack.
Off we went again. Transformed! The 10 x 8 prop had loads of thrust and the model just climbed away within a few feet, without a care in the world. The Gee Bee was very stable in flight and the aileron movement was just about right for a sprightly 'bank and yank' pylon turn. Keep the speed up of course for realistic flights!
This time the battery lasted a lot longer, giving me around seven or eight minutes before the power began to sag. The landing was uneventful without a hint of a stall.
I flew the model out of doors in a gentle breeze, but I have no doubt that the Gee Bee would be as equally at home in an average size sports hall. All those Gee Bee 'Doom & Gloom' merchants at my club will have to think again!
Summary
Fan-Tastic Models have produced a fantastic (pardon the pun) little model.
A well known but little modelled aircraft, that has caught the imagination
of millions can now be yours, without the worries of the fully size aviators
of the 1930's.
This model has been expertly designed and put together. The model has an excellent scale shape and is well detailed right down to the pilot! The instructions are an example of how instructions should be written. Bigger companies should take note!
The flying qualities are as good as the rest of the kit. She flies without vices and you should have hours of fun both indoor and out. I know I shall!
| Technical Details - Gee Bee R1 | |
| USA Manufacturer | Fan-Tastic Models (www.fan-tasticsmodels.com) |
| Aircraft Type: | Scale Outdoor/Indoor electric park flyer |
| RRP | $109.95 (+ p&p outside USA) |
| Wingspan | 31 inches |
| Area | 165 square inches |
| Weight | 12 ozs (13 ozs in review model) |
| Length | 21 inches |
| Number of Channels: | 3 Channel Radio / 2 Servos + ESC |
| Controller | 3 - 5 amp ESC |
| Control Functions: | Ailerons/rudder (coupled), Elevator, Throttle (ESC) |
| Motor | GWS IPS Twin 'A' RXC 7.2v |
| Propeller | GWS 10 x 8 |
| Battery Pack | 8 cell 150 mAh battery (150 NiCad & 300mAh NiMh used on review model) |
| Availability | Unfortunately this company is no longer trading |
| Likes | Dislikes |
|
|

| Info Panel |
|
Gee
Bee R1
Fan-Tastic Models |
| Comments: This model has been expertly designed and put together. |
| Price: $109.95 (+ p&p outside USA) |
| See Technical Details Below |