
![]()
![]()
![]()
![]()
![]()
![]()
![]()
![]()
![]()
![]()
![]()
![]()
![]()
![]()
![]()
![]()
![]()
![]()
![]()
![]()
![]()
![]()
![]()
| Easyweld - Does It Live Up To It's Name? |
 Have
you ever thought that an engine was a total write off, or required an expensive
replacement part after a very innocuous bump? Knowing that an aluminium
weld would sort it out, your first reaction might be to say "out of
my league!" Knowing how difficult such a weld could be, the engine
had to be consigned to the bin. Well, not anymore!
Have
you ever thought that an engine was a total write off, or required an expensive
replacement part after a very innocuous bump? Knowing that an aluminium
weld would sort it out, your first reaction might be to say "out of
my league!" Knowing how difficult such a weld could be, the engine
had to be consigned to the bin. Well, not anymore!
Before you rush out to buy an expensive spare part for that broken mounting lug or exhaust pipe, take a look at this latest DIY aluminium welding kit.
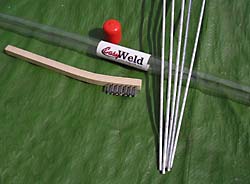
Easyweld is a new system that claims to be the best alternative to conventional Aluminium welding processes. I was asked by the FS Editor, to test this product. He said try a repair of a 'larger' aluminium product from the aeromodelling industry. A model engine exhaust silencer to you and me!
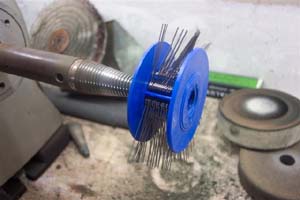
Firstly,
here are some of the technical details. Easyweld aluminium welding rods
can be used to repair Aluminium,
Al-alloys, Zinc, Pot metals, Die-cast and Kirksite dies. This product
is designed specifically for welding aluminium and uses no flux, making
it easy to use and environmentally safe. A low working temperature of
732° F (392° C) is required to perform the weld. You can't use
Easyweld on Magnesium. (To test for Magnesium shave a small piece of metal
and apply the flame. If it burns white, then it is Magnesium). Do not
use it on Pewter or tin as they will melt before the working temperature
is reached. The rods will not work on Stainless Steel or any other type
Steel (except galvanised).
Well that's the technical bit out of the way! Let's see if Easyweld lives up to its name!
To ensure that a true weld could be made and to the test the strength of the repair, I deliberately broke an exhaust to see if the repair using 'Easyweld' was in fact easy.
 I
am a manufacturing Jeweller by trade and have the necessary equipment
to attempt this repair to hand, so here goes.
I
am a manufacturing Jeweller by trade and have the necessary equipment
to attempt this repair to hand, so here goes.
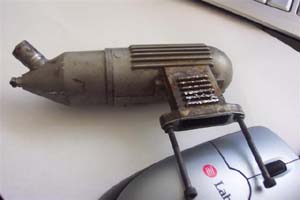
Firstly, a trip into the loft to find a used silencer, as the effects of fuel and oil contamination may affect the repair characteristics. I found an old and well used exhaust in order to simulate a typical crash situation. The next task was to deliberately break it in order to repair it using the Easyweld aluminium repair kit.
Hmm! This proved a little more difficult than I first envisaged.
I clamped the exhaust by the exit port into the vice very tightly - half expecting it to fracture, but it didn't. The next task was to take a mash hammer to it, for the decisive parting of the baffle. I didn't use a normal joiner's hammer, because I'm currently suffering with tendonitis (Tennis elbow) in my right elbow. I wanted this to be a clean break in the exhaust, simulating sudden impact of an aircraft with terra firma. I wanted the least pain possible; with a one hit decapitation as it were.
 A
very worrying factor (apart from the pain) now was that, after three valiant
attempts to break this exhaust in two, I had failed miserably and the
exhaust was still intact.
A
very worrying factor (apart from the pain) now was that, after three valiant
attempts to break this exhaust in two, I had failed miserably and the
exhaust was still intact.
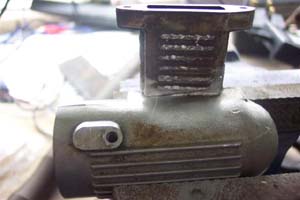
The cooling fins on the port of the exhaust suffered greatly with the tight grip the vice had on them, and a few heavy dents on the rear of the baffle where impacts had been made with the mash hammer.
If a mash hammer can't break an exhaust after three attempts, then what sort of energy does it take to break an exhaust when your model aircraft hits the ground?
 If
I can't break an exhaust with a hammer, but an exhaust breaks on impact
with the ground, it does make you think about the forces involved if an
individual happens to be unfortunately hit by a model aircraft.
If
I can't break an exhaust with a hammer, but an exhaust breaks on impact
with the ground, it does make you think about the forces involved if an
individual happens to be unfortunately hit by a model aircraft.
So, it's time for the heavy gear! Bring in a Jewelers ring mandrill! I unbolted the baffle and inserted the mandrill to lever the exhaust from the exhaust port. It did the job but not quite as I expected.
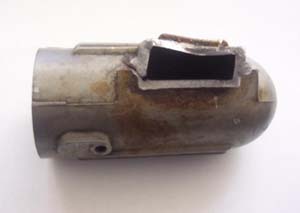
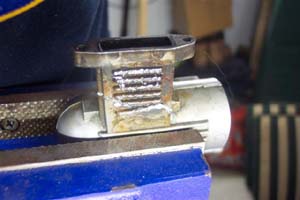
The main aim was to have the exhaust break with a clean snap; however, it tore it off leaving a horrible situation that the two halves wouldn't marry up at the 'break'.
So, after a bit of grinding I managed to get close to a match but not ideal. It would however suit our test.
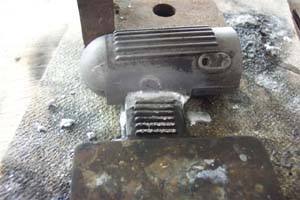
The realignment wasn't perfect but was workable. Note that the vice is holding the baffle for the picture. (Above & below).
The Easyweld instruction stated to use the wire brush (supplied) to clean the area of the breaks, but I didn't use it. I elected to use a scratch mop, which is basically a rotating wire brush (used for a textured effect on Jewellery) and this seemed to work quite well as the area for the 'welding' had to be as dirt free as possible.
 |
 |
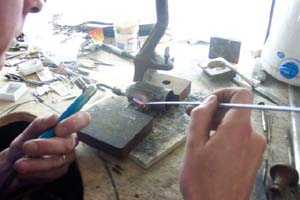
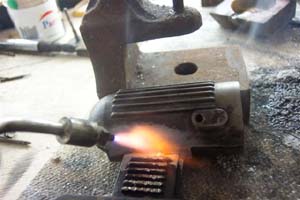
So, onto the asbestos block and start heating with a 'microweld' torch.
 This
again is a Jewellery repair torch, which runs on Methyl Ethyl Ketone and
caustic soda (using water as a cooling agent). The instructions suggest
a blowtorch, any handheld torch - Oxyacetylene, Mapp, Propane or Butane.
But I thought that this would be quite a long process. However, with hindsight,
it could have solved yet another problem
This
again is a Jewellery repair torch, which runs on Methyl Ethyl Ketone and
caustic soda (using water as a cooling agent). The instructions suggest
a blowtorch, any handheld torch - Oxyacetylene, Mapp, Propane or Butane.
But I thought that this would be quite a long process. However, with hindsight,
it could have solved yet another problem
A blowtorch will be slower but heats a much wider area. I found it quite difficult to 'weld' on more concentrated areas with the microweld torch, as the welding rods tended to 'blob', a bit like tin soldering. So, it really did need heat from a blowtorch with a wider nozzle.
You must heat the material that you are working on to 732°F and then apply the rod. The material must be cleaned with the stainless steel brush provided, (or in my case the scratch mop). The rod will not adhere to the material being brazed if it is cleaned with a steel or other type brush. This removes any unwanted particles from the repair/weld area. Once the working temperature is reached, the rod will flow like solder.
 The
welded/repaired piece should be left to cool naturally, at room temperature
- DO NOT use water or acid baths to speed up the cooling process. When
you have completed the weld and the job has cooled, it can be ground and
polished to a fine finish.
The
welded/repaired piece should be left to cool naturally, at room temperature
- DO NOT use water or acid baths to speed up the cooling process. When
you have completed the weld and the job has cooled, it can be ground and
polished to a fine finish.
All in all then what were my impressions? Easyweld was really quite straightforward to use and although my finished result wasn't the prettiest, it was certainly up for the job. To test the results I tried breaking the joint to ascertain the quality of the bond. It took the same force and method to re-break the weld as I had used originally!
 I
now wish I'd used the blow torch though, as the 'blobbing' of the welding
rod was quite extensive - leaving quite a lot of wastage.
I
now wish I'd used the blow torch though, as the 'blobbing' of the welding
rod was quite extensive - leaving quite a lot of wastage.
Easyweld
carries a 100% guarantee. If you are not entirely satisfied, you can return
the product in its original packaging and Easyweld will refund your money.
No questions asked!
Marks out of ten? Well I'd have to give it as close to 10 as possible.
A note however to aeromodellers. In the instructions, it mentions that you can repair aluminium propellers, which I assume would be a boat's propeller, because all metal propellers in the aeromodelling world are of course banned on safety grounds! But it does go to show the wide uses that Easyweld can be put to!
Summing up then. A nice product that does exactly what it claims to do.
www.durafix.co.uk
or telephone 0845 094 2131
Int +44 (0)1253 3115462
Durafix UK Limited
14 Gateside Drive
Blackpool
FY3 7PN
United Kingdom
Please
mention 'Flying Sites' when contacting
www.durafix.co.uk
| Info Panel |
|
Easyweld
Aluminium Welding Kits |
| Comments: Nice product that does exactly what it claims to do! |
| Prices
From: £9.95 |