
| C130 Hercules For Electric & PSS |
 The
Hercules C-130 transport aircraft is the stalwart of many military and
civilian air forces around the world, and affectionately know as Fat Albert.
The 'Herc' was first built and flown from the Lockheed Company's Burbank
runway in August 1954. The 'Herky Bird' has gone on to see service in
every corner of the globe. More exotic uses include space recovery, polar
survey, and surveillance and coast guard duties. So it shouldn't be difficult
too find a colour scheme to please you!
The
Hercules C-130 transport aircraft is the stalwart of many military and
civilian air forces around the world, and affectionately know as Fat Albert.
The 'Herc' was first built and flown from the Lockheed Company's Burbank
runway in August 1954. The 'Herky Bird' has gone on to see service in
every corner of the globe. More exotic uses include space recovery, polar
survey, and surveillance and coast guard duties. So it shouldn't be difficult
too find a colour scheme to please you!
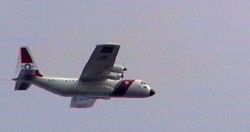
 This
semi scale rendition of the 'Herc' from Combined Ops Kits (HFM Marine
Aviation & Mellor Aviation) has been designed to be almost as versatile
as the prototype on which it is based. This 54-inch span model can be
built as a slope soaring PSS model and as a twin Speed 480 powered electric
model. You can even alternate your flying depending on your mood. Just
ensure that the C.G. is correct when you take out the electric power pack,
before you go slope soaring with it! The 'Herc' is a two channel aircraft
using elevator and ailerons (or three if you use an electronic speed controller
for the throttle).
This
semi scale rendition of the 'Herc' from Combined Ops Kits (HFM Marine
Aviation & Mellor Aviation) has been designed to be almost as versatile
as the prototype on which it is based. This 54-inch span model can be
built as a slope soaring PSS model and as a twin Speed 480 powered electric
model. You can even alternate your flying depending on your mood. Just
ensure that the C.G. is correct when you take out the electric power pack,
before you go slope soaring with it! The 'Herc' is a two channel aircraft
using elevator and ailerons (or three if you use an electronic speed controller
for the throttle).
So what do you get for your money? Well, an awful lot is the answer. The kit comes with a completely moulded and joined fuselage, pre-cut and shaped balsa for the tail feathers and wing ribs, piano wire joined elevator and a comprehensive hardware pack with horns. Sheathed piano wire for aileron push rods, bell cranks, nuts and bolts, screws, wing bolt and bracket plywood, and threaded pushrod ends and hinging materials.
 Wing
Building
Wing
Building
The only major work undertaken on the 'Herc' is to build the wing. Once
again all parts are supplied and made to a high standard. The wing is
partly foam core and partly built up.
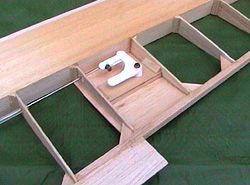
There are three sections to the wing. The leading 'D' box sections come complete with obeche covered foam cores and main spars, these are already fitted at the Mellor Aviation factory. All that remains to be done is to join the outer panels to the centre section with ply braces and fit the balsa leading edge. The complete wing building process is explained on a full size plan and backed up with a three-page instruction sheet.
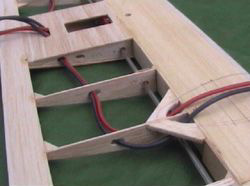
 Once
the main 'D' box sections are joined you next add all the very accurate
pre-cut half ribs, triangular reinforcements, trailing edges and false
trailing edges where the ailerons are housed, plus wing tip blocks. I
would advise that you pre-cut holes in each rib to accommodate not only
the aileron push rods but also any electrical wiring that you might want
to install. This is a lot easier than trying to drill holes in the ribs
of the completed wing.
Once
the main 'D' box sections are joined you next add all the very accurate
pre-cut half ribs, triangular reinforcements, trailing edges and false
trailing edges where the ailerons are housed, plus wing tip blocks. I
would advise that you pre-cut holes in each rib to accommodate not only
the aileron push rods but also any electrical wiring that you might want
to install. This is a lot easier than trying to drill holes in the ribs
of the completed wing.
A ply mounting plate takes a 90º-bell crank and is inserted between two outer wing ribs. This bay is then sheeted both on top and underneath the wing. An exit slot is then cut on the underside to accept a wire push rod. The sheathed piano wire push rods return to the centre section where a single standard size servo is mounted to activate the aileron controls. Ailerons are then hinged and added to the wing. All that remains is to cover the wing. This I did using standard Solar Film.
 Fuselage
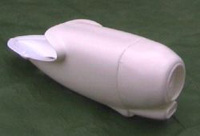
The largest part in the kit is the full moulded 34-inch long fuselage.
This has been moulded in 1.5mm high impact polystyrene (not to be confused
with expanded polystyrene) and is extremely solid as well as being strong.
All the difficult work of joining the fuselage has been done for you.
The two moulded sections have been bonded to a central vertical crutch,
and then the joints have been filled and rubbed down to give you the complete
fuselage.
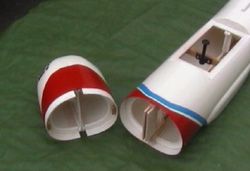 The
front cabin section is detachable and gives access to not only the interior
of the main fuselage but also, in the nose section, to an internally moulded
receiver battery box. This is required to get some weight into the nose
for those slope soaring expeditions.
The
front cabin section is detachable and gives access to not only the interior
of the main fuselage but also, in the nose section, to an internally moulded
receiver battery box. This is required to get some weight into the nose
for those slope soaring expeditions.
A wing bolt bracket is bolted to a hardwood bearer and is then glued across the wing seat aperture. This is best done after completing the wing, so that you carefully line up the bolthole in the wing and the bearer in the fuselage. Apart from painting and fitting your elevator servo there's only the tail feathers to fit into the fuselage.
 Tail
Tail
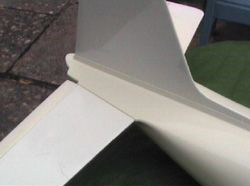
All the balsa for the large tail fin and stabilisers are supplied, cut
and shaped. The elevator is also pre-joined with piano wire. Again, the
only finishing work to be done is to cover the surfaces with your preferred
finishing materials and add the supplied control horn. Next, hinge the
elevator but DO NOT join to the stabiliser at this stage. Next
slot the elevator into the fuselage. (One thing to note is that you don't
glue the elevator/hinges to the stabilisers before inserting it through
the fuselage) otherwise the completed section would not be able to slide
through the fuz. It takes a little wiggling to do the job properly.
After the stabilisers and elevator have been inserted, secure them with polystyrene cement. Now you can join the elevator and stabilisers together via their appropriate hinges. The elevator is controlled via a push rod snake. This exits through a hole in the side of the fuselage. At first viewing, I thought that the elevator looked awfully narrow. My concerns were totally unfounded as the first flight soon proved. There is more than enough control authority and the size of the elevator is just right!
 Engine
Nacelles
Engine
Nacelles
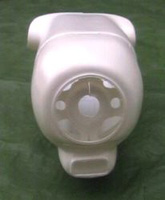
The 'Herc' comes with a myriad of other vacuum-formed parts. These include
drop tanks and hard mounting points, spinners and all four engine nacelles.
All these parts come as half mouldings and have to be trimmed up and joined
using standard polystyrene cement. The four nacelles have been reproduced
to the correct shape and size. The clever part here though, is the way
the front of the nacelle moulding has been designed to mount a Speed 400
or 480 sized electric motor. Once the motors have been inserted, two screws
secure the motor to the nacelle. When this has been completed, you must
just add the front section caps over the motor mount to complete the nacelle.
To complete the two outer engine nacelles, mould spinners have been included.
These just glue straight onto the nacelle.
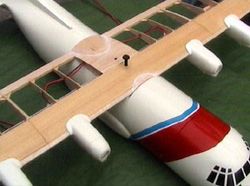
Once completed the nacelles are then screwed to underside of the wing via small ply mounting plates. Other details like the drop tanks were joined and glued to the wing. These little extras should not be omitted as they do give 'Fat Albert' its distinctive look!
 Colour
Schemes
Colour
Schemes
It should not be difficult to find a colour scheme for the C130. From
camouflage to Desert Storm, there should be something to suit every taste.
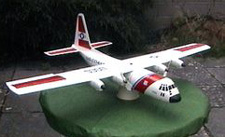
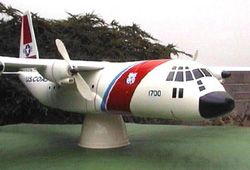
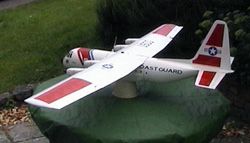
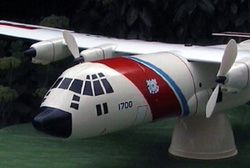 I
decided to reproduce the colour scheme of the United State Coast Guard.
After some searching on the web (where else!) I found several sites with
pictures and information on the US Coast Guard. The red, white and blue
colours make an attractive scheme. After spraying the fuselage white,
I masked off the main fuselage red stripe area and again sprayed this
with car aerosols. The cockpit windows were masked and then sprayed black.
I
decided to reproduce the colour scheme of the United State Coast Guard.
After some searching on the web (where else!) I found several sites with
pictures and information on the US Coast Guard. The red, white and blue
colours make an attractive scheme. After spraying the fuselage white,
I masked off the main fuselage red stripe area and again sprayed this
with car aerosols. The cockpit windows were masked and then sprayed black.
The narrow blue stripe is applied from Model Technics Trim Line. The rest of the stickers, stars and bars, logos, door edges and lettering were made up on the computer and printed to ink jet sticky black vinyl, supplied by Overlander. After applying the stickers to the model, I gave them a light coating of clear lacquer, just to seal them from dirty fingers.
 Flying
The latter part of this summer (2002) has seen many suitable flying days,
so it wasn't long before I took 'Fat Albert' down to our flying site.
With the battery pack mounted close to the C.G. the model balanced spot
on the main spar. Just right! The wind was a little breezy but as the
Herc was designed to fly from the slope, I thought that this would not
be too much of a problem.
The Speed 480 motors were fitted with 7 x 4 props and powered by an Overlander Sanyo SC1900 mAh eight-cell battery. Controlling the power was a Jeti 350 speed controller. All up weight, including the power pack was only 3lbs.12oz. The weight of the PSS version is of course a lot lighter, by about a pound and a half, making it's all up PSS weight around 2lbs 3ozs. Ideal for a wide range of slope condtitions.
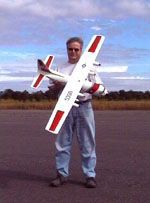
 My
helper, 'PJ' had the launching honour. He pointed the Herc out over the
cornfield and as I opened up the motors, she already wanted to get airborne.
With a gentle push forward and with the nose slightly up, the Herc rushed
away looking for home! The model climbed steadily and I fed in a little
down elevator trim and reduced the throttle.
My
helper, 'PJ' had the launching honour. He pointed the Herc out over the
cornfield and as I opened up the motors, she already wanted to get airborne.
With a gentle push forward and with the nose slightly up, the Herc rushed
away looking for home! The model climbed steadily and I fed in a little
down elevator trim and reduced the throttle.
Bringing her around and downwind, she gathered speed and started to climb again, due to the flat bottom wing section. Remember to feed in a little down elevator. This not only keeps her level but also will maintain your airspeed. Back into wind now and she was looking every part of a winner. The bumpy wind conditions were no problem to her at all. A mark of her slope soaring pedigree!
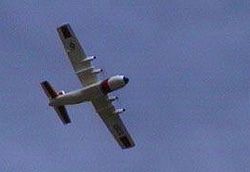 Next
I tried slowing her right down and proceeded to fly some low passes for
the camera. Once again she handled impeccably. Now to try some high-speed
stuff! Tight banking turns (more than 70º) she starts to drop her
nose. This is nothing to worry about as she certainly doesn't want to
drop her wing, but at the speed she's travelling it might catch out the
unwary.
Next
I tried slowing her right down and proceeded to fly some low passes for
the camera. Once again she handled impeccably. Now to try some high-speed
stuff! Tight banking turns (more than 70º) she starts to drop her
nose. This is nothing to worry about as she certainly doesn't want to
drop her wing, but at the speed she's travelling it might catch out the
unwary.
With careful use of the throttle, I managed to get over seven minutes duration out of the batteries. You really don't want to be blasting around the sky for the entire flight. Long slow passes up the strip do look most realistic. Do keep a check on the time however, as you will want to set her up for landing before the juice runs out. Our club flies from a tarmac runway, so I had to land her in the adjacent cornfield. The three-foot high wheat makes an ideal soft landing area and she came in without any problems at all. If you fly from a grass strip then you will be able to grease her into a fine landing.
 Conclusions
The Hercules is a well-designed and produced kit from a British Company
with 30 years experience of manufacturing model boats and aircraft. All
parts are made and finished to a high standard. Accessories are of the
type that I would normally buy, so there's no disappointment there.
This is a very complete kit. It's not quite an ARTF but one you can finish quickly with some building experience. It is also a very versatile model catering for both slope soarers and ower flyers. It's not a model for novices but a competent 'A' Certificate flyer will have no problems.
It handles a wide variety of wind conditions. I would certainly recommend it as a second or third model. I thoroughly enjoyed building and flying this one and the Herc is now one of my regular flying models. It certainly turned a few heads at our club, with several members asking where they could get one.
Now, it's off to the slope to chuck it off a mountain!
SLOPE TEST
Our
test-flying programme has taken quite some time but it has been well worth
it. After first testing the electric flying qualities of the C-130 we
had to fly as a P.S.S. on our local slope.
As is usually the case with all first flights the wind strength and direction were not quite ideal but we were all charged and ready to go. Standing on the edge of our hill, we both had that feeling inside of will it go or will it make a fool of us in front of the other seasoned flyers who had landed just to see the fun of another crash, and say "you didn't want to do that".
Range
check, control check and one last look at the complete model in my hands.
"Would it still look the same after the first slope flight"?
"Launching". Out and up she went, just like the proverbial home
sick angel. "How does she feel?" were the first word I heard.
"Good so far" I said. Still gaining height brought her across
the slope to have a look at the attitude she was flying at. We both agreed
that a little weight was needed so a quick climb for height a fast run
down wind, turn and level out for landing. "I will bring her in fast
for the first landing so that we can fly through the rollover and turbulence."
What a landing straight and level. As we walked out to retrieve Albert
a round of applause from the assembled multitude greeted us. One wag piped
up. "They would be pleased with that landing at R.A.F. Lynham".
We both felt great, by now the adrenaline was running high. Positioning
a sliver of lead brought the CG right onto the main spar, nose down every
so slightly. Reassembled, we were ready to go again.
The second flight is more nerve-racking than the first because you are now a lot more confident so you tend to push the test envelope a bit harder.
Off she climbed again. "I will try to gain as much height as I can then we can test the stall" At a good height and into wind I started to pull back slowly on the stick, the nose started to raise higher and higher, "there she goes just dropped her nose after the stall and still remained in straight and level flight, that will do for me".
Now the confidence was there a quick tight turn and I had dropped down to deck level. "Terrain hugging that's what she is made for" at the end of the pass pull back on the stick and I was top of the stack again. "I wonder if she will loop? I've got enough height here we go". I put the nose down at a gentle angle let the speed build up and pulled back on the stick. "Wow she did it, that was great" There was no significant dropping a wing at the top of the loop. "What next? " "I will try a roll a roll" I pulled back up to the top of the stack straight and level, nose down and hey presto a beautiful slow roll. There is nothing wrong with this one; it flies like a dream with no vices. The rest of the test flight consisted of tight turns, slow low passes and high-speed dives. The 'Herc' fills you full of confidence so I want to try a loop and roll out". The manoeuvre was started with a shallow dive pull up for the loop and 2 rolls out at the bottom. That was enough for today, turning back and lined up for landing and she came in sliding to a halt. Makes you feel good, an all that in 2 flights.
Since this first PSS flight she has flown several time in varying conditions. Strength of wind is no problem; proving she is just as happy in a thermal as on the slope. 'Fat Albert' can be flown in conditions when all other aircraft were grounded. With the way our weather is reportedly going, with either too little or too much wind, the C130 will be able to fly whatever the conditions.
The Hercules is no longer available
 Click Here For Mpeg Video Clip of the Hercules in flight(2.6Mb) |
| Technical Details - C-130 Hercules. | |
| UK Manufacturer | |
| Aircraft Type: | Semi Scale electric and PSS |
| RRP | £119.95 inc. p&p |
| Wingspan | 54 inches |
| Wing Area | 324sq ins (approx) |
| Wing Section | Clark Y Mod. |
| Weight | 3lbs 12oz for Electric or 2lbs 3ozs for PSS |
| Length | 34 inches |
| Number of Channels: | 2/3 Channel Radio / 2 Servos + ESC |
| Control Functions: | Aileron, Elevator, Throttle (ESC) |
| Motors: | 2 x Speed 400 or Speed 480 |
| Battery Pack: | 8 Cells - 1250 to 2400 mAh |
| Likes | Dislikes |
|
|
| Info Panel |
|
C-130
Hecules
No Longer Available |
| Comments: As versitile as the real thing. Two models for the price of one! |
| Price: £119.95 inc p&p |
| See Technical Details Below |
| Click
Here For Mpeg Video Clip (2.6Mb) |