

| Seagull Arising Star (Electric Conversion) |
Photos by Terry Antell
Model and all equipment supplied by Simon Willey of Model Pro Ltd
Since I started model flying 3½ years ago, I have flown a number of different models and at different sites. I have looped a scale 5m glider, and a 2 foot span one. I've flown on sites ranging from a 20 foot gravel bank to a 400 foot vertical cliff, flown brushless/lipo models that climb vertically and under-powered electric gliders that barely get in the air.
But such is the nature of model flying that there are still challenges to be conquered. At present my most aerobatic model is a brushless powered GWS Formosa, but I want to get something better. I finished last in our club thermal competition, possibly the fact that I am using a 2m slope model against 3.5m thermal mouldies was at least in part to blame, or I hope it was. There remain a lot of things I want to do in model flying, and most require investment in new models.
Until a few months ago, an IC trainer model was on about page 8 of my list of priorities. But when I won the Flying Sites competition for a free week's accommodation at the RC Hotel in Corfu, I realised that my Rise off Ground (and return onto wheels) experience was sadly lacking. In fact I had only once flown an ROG model!
So why am I writing a review about a classic IC trainer? Simple, this one is an electric conversion! Still not my first choice of model, but as my friend Simon Willey of Model Pro is undertaking the testing of the electric version for Perkins, he wanted to get another opinion from someone who is not quite the expert that he is! So he is loaning me the model and gear to assemble and test it.
 For me this will be the largest and heaviest powered model I have flown, with the most powerful motor, and the first proper ROG model. So whilst I have no doubts about my ability to fly it without too much danger of bending it, in many ways I am inexperienced in a model of this type, and thus the ideal candidate for the non-expert testing.
I assembled a team of experts to assist me with the construction and early flying of the model, not because I anticipated any major difficulties, but because this is what a novice should do, and when I was a novice, I had done just that. Also my building facilities are not spacious, and recent developments in my ongoing health problems make prolonged or fiddly jobs with my hands very difficult. So I had two people with experience of models of this size to advise me and do the things that my hands will not allow at present.
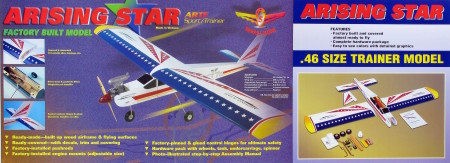
So what is the Arising Star? First the web site specs:
- Wingspan - 63ins (160cm)
- Wing area - 645 sq.ins (41.6 dm.sq)
- Suits - .40 - .46 2-stroke. (.52 4-Stroke)
- 4 channel RC with 4 servos (In my case 3 servos and a speed controller.)
- Skill Level - Beginner
- Approx flying weight - 5 - 6lb (2.3 - 2.7kg)
 It is a High wing monoplane with a tricycle undercarriage.
Since the building of this ARTF model is very simple, I do not intend to go into this in much detail. I will outline some differences that the electric flier with no IC experience (like myself) would encounter, but mostly concentrate on the Electric conversion aspects.
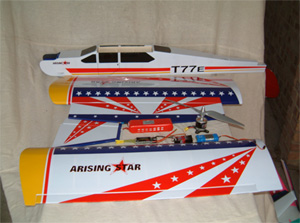
And so to opening the box. Neatly laid out and wrapped were the complete fuselage, wings in two pieces, the tail feathers and hardware, with a 16 page instruction manual with ample photographs. Also supplied for the electric conversion were the JP EnErg C4220-16 690rpm/v outrunner brushless motor, the EnErg Pro 20C 4300mAh 4S1P LiPo, the E-Pro SP-80A - Opt - Air ESC, an 1100mah 6v Rx pack, a GWS 8ch Rx and fitted to the motor was a 13x8 Electric propeller
I had left the selection of a power train in the hands of the expert. Simon likes at least 100w/lb, and he had tested this set-up to a maximum of 774 Watts, more than enough for a 6lb model, even if it ends up at the top of the weight scale. At the power levels this combination is capable of producing, performance will not be lacking. Most people suggest that 75W/Lb is sufficient for a trainer, but like Simon I believe that having the power does not mean I have to use it, not having it means it is not there when I need it! Ever tried pulling out from behind a truck when riding a restricted moped? I did – once!First impression was that it's BIG. Compared to my largest powered model, this thing is huge! And there is so much room inside. The construction is very simple, but I think if the designers had been intending electric power from the outset, lighter materials and construction might have been used. That's not to say that it's heavy, the fuz and tail, with no motor mount but with the 2 servos, is 1lb 9oz and the wings with aileron servo are 1lb 12 oz. The electric motor weighs 8oz and the battery 13oz, and then add an rx pack, Undercarriage and a few more bits of radio gear plus a motor mount and we should end up just over 5lb, near the lower edge of the intended weight. I have seen electric models of greater size that weighed the same as the “Star”, and larger IC models that weighed less, too.
 The first task was to remove the fitted I/C motor mount, and the fuel tank neck piece. This gives you a bit more room. The Radial mount for the electric motor was then placed in position. We found that the top bolts fitted perfectly, but the lower ones did not. Drilling the required 5mm holes proved tricky, as the standard length drill bit was not long enough to make room for the drill chuck, but a little creative thinking solved this. I had a bit intended or use with a cordless screwdriver that has a hexagonal end. This was put in a socket, and a short extension was put in the drill chuck.
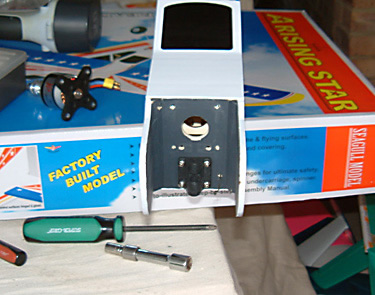
Removing the caged nuts from the holes from the original holes was simple, we just put the bolts in and tapped them out. Refitting them proved more awkward. More on this later. (The photo on the left shows the IC Motor mount removed. The 2 lower mounting holes are drilled out and can be seen as the outboard holes just above the nose wheel pivot).
I then commenced construction as per the manual. The servo tray needed some trimming, but this is far better than the holes being too big! This also applied in the wing. One point on the wing, I found some pieces in the box and a picture in the manual that showed them fitted to the trailing edge centre section, but not a word in the text! Small potatoes for me, but a beginner, without advice from someone more knowledgeable, could worry about it, not knowing what they are for. I remember when I was building my first model a series of panicking emails to the designer to clarify a very minor point! Luckily he has a sense of humour! The main points of the construction were (1) fit wing joiner and glue the wings together, (2) remove the covering from the tail slots and the tail feathers and glue them in, (3) fit and connect the servos, (4) fit the undercarriage. Where gluing was needed I used a quality epoxy.
Back to refitting the lower caged nuts for the motor mount. At this point we were still working through the wing hole, but later we realised that making a front hatch was both simple and helped a great deal. Life would have been far easier if we had done so now. The hatch was cut using an angled scalpel so that it already had an edge to rest on. Then a small lip was glued to the underside of the front edge to hook under the fuz top. Without this, we found that reaching the rear of the firewall to hold these in place was tricky, so a piece of 4mm studding was employed. The caged nut, which is the type that has spikes to grip the wood, was threaded onto the end and given a few turns. This was then pushed from the wing opening through the firewall from the back and out the front. A washer was cut to clear the fittings at the front and a nut put on. Screwing this up by hand and then with an open-ended spanner pulled the lock nut perfectly in place. Whilst the studding was in place, we also looked to see if there was any right thrust or down thrust. There is a bit of right thrust, but if there is any down built in, it is only a degree or so. However, the motor mounting to be employed gives the capacity to fine- tune this at a later date if required.
Simon had supplied some 4mm bolts, washers and tubing sleeve to mount the motor, and these fitted perfectly, a dab of thread lock being applied as a matter of course.
The tubing, as well as making the mounting tidier visually, also spaces out the motor to the correct distance. The completed mount is strong enough to lift the model and hold it horizontally.
With the motor secure, it was now time to turn our attention to the requirements for the Centre of Gravity. By trying things out we found that the Flight pack and Receiver pack needed to be well forward, as far forward as possible. A useful tip was passed to me at this stage; the material used to make the model has some treatment that means that self adhesive Velcro is not very adhesive. Pouring a little runny CA on the area and allowing it to go off completely before applying the velcro cures this. Using this method, the Receiver pack was attached as far forward as possible on the right hand side.
I dislike having batteries not fully supported and protected against any bumps, so I taped a foam and balsa “bumper” to the front of the battery to prevent any damage in the event of an arrival. A model as simply constructed as this would be fairly easy to repair, but not if a ruptured lipo has caused it to be burnt to ashes! As there are the motor mounting studs at the front, protection against these piercing the pack was deemed to be a wise move. I also decided that it was unwise to simply have the battery resting in place, so a basic battery tray was fitted. I did this by first shaping a piece of square balsa stock to fit the front former, which is rounded to hold the fuel tank. I then used a sheet of balsa cut to the battery size and with a little scrap triangular stock glued to the sides and fitted this in, sloping it down to meet the firewall at the bottom and out backwards. The battery can then be secured using a rubber band at the back, which will also be used to prevent a battery short by putting one cable under it on one side and the other cable on the other when not in use. The components were installed as per the pictures
Another item I had to test and write up is BNB DPR – 50 Data logger from Aurorra Ltd. Data that Simon sent me suggested that the motor would pull 53amps with this prop, so I changed the prop for a 12x8 one, as the logger only goes to 50 amps
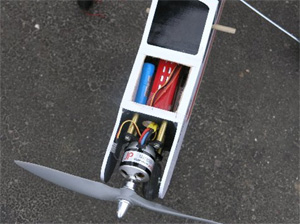 |
Ready to go. This photo (left) shows the hatch open shows some of the layout. Taped beside the motor is the RPM sensor of the datalogger. The LiPo is the red block seen through the hatch, the blue block is the 6v Rx battery. On the other side of the LiPo is the Opto ESC. |
| This photo (right) shows the area immediately under the wing. The Datalogger goes opposite the Receiver. You can just see the aft end of the battery tray. The Rx switch is not fitted in the position provided but put in the side of the fuz above the main undercarriage as it makes no sense to me to have to remove the wings to switch off! By the switch you can see the Allen key for pushrod adjustment, held by a bit of heatshrink tubing taped on the side – I always lose these, but not now! | 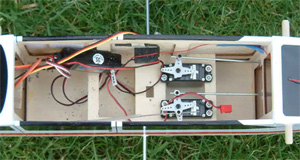 |
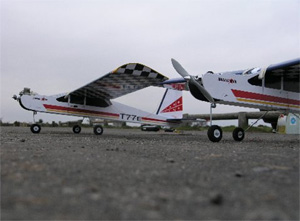 (Photo on the left. You’re not seeing double! Electric in the foreground, .40 glow behind. Note the bent nose wheel leg of the glow model after 15 flights. It also felt greasy!)
And so to the flying site! The day was not ideal, a gusty 13mph wind that was extremely turbulent, so much so that I almost decided not to fly. The only other model at the site apart from the ones my friends had was another Arising Star, this one conventionally equipped with a .40 glow engine. The owner is an experienced flier who had flown the model 14 times. This afforded an opportunity to compare the way the 2 models flew, and some differences were apparent. The first was that when warming up, the glow motor stalled and was hard to start. When running, the owner had to tinker with the mix with his hands very close to the prop. This tinkering did not prevent the engine stalling while in the air and a tricky dead stick that saw the model upside down on the tarmac, fortunately with no damage. This was contrasted by the smooth running of the brushless motor that enabled me to shut the throttle to lose height quickly, decide I was still too high and power up to come round again, shut down again and almost let the model land itself.
Another difference was that despite the fact this was the first time I had ever taxied a model, the model was very easy to steer, whereas the IC model was apparently quite unstable and was zigzagging around. As I taxied out, my friend Terry walked alongside taking pictures (maybe not expecting to see the pristine model again!) But when we reached the flight line I gently eased the throttle open, correcting a tendency to veer sideways as the model accelerated and a touch on the elevator saw her ease into the air, my first Rise Off Ground safely accomplished. Climb out was a bit steeper than the IC model and I was quickly at a height where I could consider trimming the model, so I eased back to half throttle. However, the bumpy air was such that trimming was not only difficult, it was irrelevant! The trim was close enough to enable me to fly safely, as the model would rise on over half throttle, cruise level at half throttle and descend at less than this.
The model appeared to fly straight, but with turbulence throwing her up and down and from side to side, constant attention to the steering was needed. In fact at one point she dropped a wing and I opened up, straightened the wing and over corrected the dive to go straight over the top in a somewhat startling loop! I was so surprised I nearly did another one before I put down elevator in and levelled out. There is sufficient power from this motor to loop from level flight, which I hope to prove when flying in cleaner air.
Luckily the turbulence was less as I got lower, so I was able to land reasonably easily. Unfortunately for me the ideal approach was over the car park, out of bounds to all flying, so I was forced to turn whilst still higher than I would have liked, so I went round again. The second time I was a little lower, but still too high, so I cut the throttle completely and allowed her to descend neatly and roll out. Then I could breathe again!
 One thing that was apparent from the flying and was confirmed visually was that there was more down than up in the ailerons. Since these are factory fitted, there is only one thing to do about this – fit a disk servo arm with the connections forward of centre. As the Manual clearly shows a straight arm, I wonder how many Stars out there have this differential. Maybe they are trying to make sure the student learns to use the rudder!
The following day was far better, with almost no wind. I was well aware that this would mean a higher ground speed for take off and landing, but smoother air meant I could fly the thing rather than straighten it out again and again. One thing was quickly apparent, there was some glitching going on! This had probably been hidden in the turbulence of the previous day, but a split second loss of power or a twitch of the controls was both audible and visible in the quieter and smoother air. But I was able to gain height safely, the ample power pulling her up swiftly to a cruising height. Cutting to half throttle, I added a touch of up elevator and she was flying smoothly. A blip on the throttle and a touch on the elevator and she was doing a lovely smooth graceful loop from level flight, still on the training settings on the Dual rates. I had set the control travel so that full rates gave the aerobatic settings from the manual, reduced rates gave the trainer settings. With the aileron differential sorted, turns were far easier. With the model flying well, it was time to pass the transmitter over to my buddies.
As expected, the landing was more difficult, next flight I will get some height and test the stall characteristics and gauge the airspeed she needs to stay airborne. Trying to avoid this I came in reasonably quickly and the ensuing bounce would have qualified for the Olympic pole vault final, but she was down! I taxied her back and handed the Tx to David, former full size pilot and massively experienced with model flying, one of the few people I know with experience of models of this sort of size with electric power. His flight was short but eventful, as he experienced a glitch on the climb out and was close to putting her down in the gorse! But the power of the motor pulled her up and away, he flew round a couple of times and landed, somewhat unnerved by the glitch. His landing did not get quite have the height of bounce that mine did, but it was longer and he did 3 bounces to my 2, but once again she ended up on all three wheels.
Then it was over to Biggles Terry, who has flown everything from IC Glider tugs to indoor models, former JR display team member and superb flier. In his hands she executed her first rolls, she goes in slowly and then decides she wants to finish this and quickens the rate of roll appreciably. She flew well enough, not exciting but pleasant, with a forgiving nature about her. Terry decided on a different approach to the landing, He brought her in under a bit of power, very flat angle of descent, but faster than David or I. The bounce was minimal, but was there. If Terry could not get her straight down without bouncing, I, on only my second landing on wheels, had no chance!
Post flight checks revealed a couple of things a bit loose and that the main wheel legs had compressed the wood a little, but nothing major. In all we had flown for about ten minutes, several taxis under power and there was no apparent diminishing of power from the battery. Much will be revealed when we can download the data logger, unfortunately I run win 98 on my elderly PC, which the Logger does not support, so this will be installed on Terry’s PC.
The glitching problem has me baffled, the Rx is the new rectangular GWS type, which I have not used before. The aerial is routed out the back, through a small hole in the fuz behind the wing and taped to the tail, so the only component it passes near is the elevator servo. Possibly the proximity of esc and battery? In any case, I have a dual conversion Futaba Rx and will put this in before the next flight.
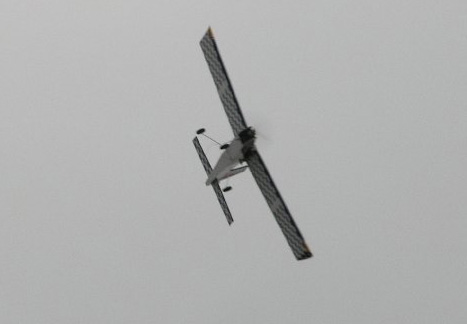
On tight turns the tail starts to drop, I had to use some rudder about a millisecond after this picture was taken! I had to turn sharply to get on the strip!
Impressions to date? A nice model to fly, well mannered and easy for learning. The quality is entirely satisfactory, apart from the aileron differential. If I owned one of these, I would look into the possibility of fitting independent aileron servos so that I could (a) eliminate or even reverse the aileron differential and (b) use flaps. I would increase the wheel size, after only four landings (not including bounces!) the standard ones are showing wear, this would also help when flying from grass. But apart from this, it is fine, and I look forward to the next flight. On my way home it started to rain, and more is forecast for tomorrow. The weekend is not a good time at the site, as one of very few IC sites in the area it gets pretty crowded. Also the two trips there this week have used my entire weeks petrol budget! Maybe those larger wheels and some grass flying next!
But before I could fly again I wanted to sort out the glitching. In doing so I learned a valuable lesson, that when using a separate Rx battery, always do your range check with the flight pack connected up. I had not done so before, but as soon as I did a range check with the flight pack, glitching started almost at once! The first thing I tried was a crystal, which made no difference at all. I then put my best receiver in, a dual conversion Futaba one, and immediately the problem was solved, I was able to walk well away with no problems at all. Simon tells me that he used the exact same components when he built one and had no glitches, so it is possibly a layout problem or to do with the Datalogger, although Simon also used one. But at least I can fly the model again!
There then followed some considerable time before I was able to fly the model again, due to health problems and inclement weather I did not want to risk flying an unfamiliar model when not feeling well. But after removing the Datalogger, it was immediately apparent that the glitches were still there, but were very much reduced. The plane was very manageable despite an odd twitch now and again; I will continue to try things out to remedy this completely. There was ample power in this set-up to loop, roll, stall turn, wingover etc. Anything the airframe could be made to do, this one had the power to do. I would not hesitate to use this set-up for a .46 sized model. This easily handled a grass strip as well as tarmac, although I did fit slightly larger wheels for this.
Conclusions
This power train is entirely suited to the model, and would be equally suitable I am sure to any .40/.46 application. In addition, the model is clean and quiet. When I picked up the .40 model to compare weight, my hands were greasy afterwards. As a viable alternative to IC power, this definitely works. If you have a model of this size and wish to use electric power, look no further. The one disadvantage is the cost. I worked out that at present the electric set-up will cost about £180 more than an IC set up, ignoring LiPo chargers, fuel pumps and other ancillaries. But if you are confined to flying electrics, as I am without paying for a different site, this is a very viable alternative. The fact that I can fly this model just about anywhere is a major advantage when 2 trips to the site uses all my petrol for a week! In this case, to fly as often as I do as an IC model would be more expensive in fuel for the car over the year than buying the electric gear as described and 2 more batteries.
| Technical Details - Arising Star | |
| Manufacturer | Seagull Models |
| UK Distributor | J. Perkins |
| Aircraft Type: | ARTF Trainer |
| RRP | £99.99 |
| Wingspan | 160cm - 63in |
| Wing Area | 41.6dm2 - 645sq.in |
| Weight | 2.3 - 2.7kg - 5 - 6lbs |
| Number of Channels: | 4 Channel Radio/ 4 Servos |
| Control Functions: | Aileron, Elevator, Rudder, Throttle |
| Engine: | |
| Electric Conversion | |
| Motor | JP EnErg C4220-16 690rpm/v outrunner brushless motor |
| Batteries | EnErg Pro 20C 4300mAh 4S1P LiPo |
| Speed Controller | E-Pro SP-80A - Opt - Air ESC |
| Prop | 13x8 Electric propeller |
| Info Panel |
|
Seagull Models Arising Star |
| Comments: This model easily handled a grass strip as well as tarmac and as an electric conversion it can fly just about anywhere! |
| Kit Price: £99.99 Electric Conversion Aound £180 Contact Model Pro Ltd |
| See Technical Details Below |