
| Getting To Know R/C Model Gliders |
There are two basic ways for a glider to gain height once airborne and these are by thermal lift, and by slope lift.
| Thermal Soaring |
 will
begin to warm by the heat radiating from the land. Some of the best places
to look for this type of lift are over freshly plowed field or a paved parking
area. The heated air will begin to rise and allow cooler air to move in
to replace it. This air, in turn, will heat up, rise, and you will get a
continuous current of rising air. As long as the air is rising at a rate
greater than a glider sinks while in flight, the glider can maintain lift.
will
begin to warm by the heat radiating from the land. Some of the best places
to look for this type of lift are over freshly plowed field or a paved parking
area. The heated air will begin to rise and allow cooler air to move in
to replace it. This air, in turn, will heat up, rise, and you will get a
continuous current of rising air. As long as the air is rising at a rate
greater than a glider sinks while in flight, the glider can maintain lift.
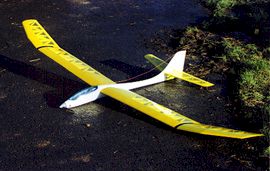
Gliders
designed for thermal soaring are usually of similar shape with long, slender
wings for greater lift and a smooth narrow body for low drag. Many will
have wings with polyhedral (a multiple dihedral) and the tail surfaces
may take several forms such as a conventional tail, crusifix tail, T-tail,
or V-tail.
| Slope Soaring |
 it
has no where to go but up. As long as the upward movement of the air is
greater than the sink rate of the glider, the craft will remain aloft. All
classes of glider will work well in slope lift as there is usually more
lift available and weight/wing loading is not as critical. Gliders designed
for thermal soaring are better suited to light winds when slope soaring
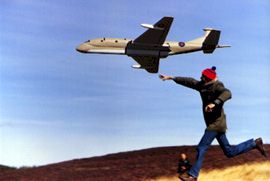
unless they can be ballasted for a higher wing loading. Slope aircraft are
usually designed with shorter, swept wings, sleek fuselages, and are extremely
fast and agile. Many designs look like jet aircraft. They can fly most aerobatic
manoeuvres and will stay in the air as long as there's a breeze and you
batteries hold out!
it
has no where to go but up. As long as the upward movement of the air is
greater than the sink rate of the glider, the craft will remain aloft. All
classes of glider will work well in slope lift as there is usually more
lift available and weight/wing loading is not as critical. Gliders designed
for thermal soaring are better suited to light winds when slope soaring
unless they can be ballasted for a higher wing loading. Slope aircraft are
usually designed with shorter, swept wings, sleek fuselages, and are extremely
fast and agile. Many designs look like jet aircraft. They can fly most aerobatic
manoeuvres and will stay in the air as long as there's a breeze and you
batteries hold out! | Launching |
Hi-Start
or Bungee
The hi-start is basically a very long catapult. It is made of a length
of surgical tubing (usually 50 to 100 feet) staked to the ground at one
end and fastened to about four times as much nylon line (200 to 400 feet)
at the other. A parachute/ring assembly on the end of the nylon line is
clipped to a hook on the bottom of the glider on the centre of gravity.
The tubing is streched to almost four times its length. When the pilot
lets go of the model, it will soar at a very steep angle until the tubing
has relaxed and the model is at peak altitude (anywhere from 250 to 400
feet). At that time, the line will drop off the hook and the parachute
will guide the line back to the ground. As launches are always made into
the wind, the parachute will float down carrying the line back toward
the location of the launch. The hi-start is an excellent choice for the
beginning sailplane pilot. Safety with the location of the stake is paramount
and should be regularly checked to see that it is still well anchored
in the ground. It should in any case be repositioned reularly.
Winch
The winch will launch a glider in a manner very similar to that of a hi-start,
but the mechanism to do this is much more complicated and much more expensive.
Winches are usually homemade and consist of an electric motor, powered
by a 12 volt car battery, driving a drum onto which the nylon towline
is wound. Again, a parachute is used for retrieval of the line. The motor
is operated by a foot switch which is quite oftenswitched on and off by
the operator so as not to overpower smaller gliders. The power of a winch
is much greater than that of a hi-start and that is why it is more suitable
for the larger models found in the "open class" type of gliders.
Power
Pod
This method of glider launch is by glow engine power assist. This is a
small engine mounted in a pod atop the center of gravity of the model.
It is used to bring the model to altitude and then is shut off or runs
out of fuel. This is a great way for getting to very high altitudes with
your model but gliding performance will suffer with a pod mounted engine
due to the extra drag.
Electric
Motor
A fourth method, which has become very popular with the advancement in
NiCd battery technology, is an electric motor launch. The electric motor
is mounted in the nose of the aircraft and will usually have a folding
prop which will fold back against the fuselage to reduce drag when the
motor run has completed.
The motor is powered by a 6 or 7 cell rechargable NiCd and will run for between 3 and 5 minutes. If a separate motor control is used, the motor may be turned on and off during flight to regain altitude if lift is poor. The disadvantage of the electric motor launch is that the extra weight of the battery will increase wing loading and reduce the glide ratio.
| What You Need To Get Started |
The
Glider
Yes of course you need an aircraft, but which type? Just as with powered
aircraft, there are some glider kits that are better suited to the beginner
than others. A good choice would be something specially designed for beginners,
requiring only 2 channels, usually rudder and elevator, a kit with a sturdy
construction, and good building instructions. This type of aircraft is
recommended regardless of whether you plan to thermal or slope soar.
Again, as with powered aircraft, you have the choice of building a model completely or just doing the final assembly of an Almost-Ready-to-Fly (ARTF) kit. Your choice should simply be driven by your desire to build. There are a few additional items you will need.
The
Radio
Along with your aircraft, you will need a radio to control it. Most aircraft
radio systems have four or more channel and come with just about everything
you need including the rechargeable battery packs.
There are some radios available with special functions included that are
usually with more sophisticated gliders. But these are not necessary for
the beginning modeler.
Although your first glider will most likely only need two channels for rudder and elevator, you are still better off buying a four channel radio system. That is because all four channel systems usually come complete with rechargable batteries while the two channel systems do not. It is always safer to fly radio controlled model aircraft with rechargable NiCd batteries. Also, the stick configuration on 2 channel radios is more suitable for ground based vehicles than for aircraft. Also ensure that the radio is on the 35Mhz waveband and not anything else. This frequency band is specially designated to model aircraft in the UK. Please read ' Getting To Know R/C Radio Systems' for more information on the right radio to buy
| Launching Equipment |
Launching
with a Bungee
Launching with a bungee is probably the simplest and cleanest way
to become airborne and is the most popular. The only item you will need
is your hi-start. Theses come in various sizes and can be found at all
good model shops.
Launching
with a Glow Motor
Most 2-metre size gliders require a .049 to an .10 engine for power pod
launch. For this you will require all the bits and pieces associated with
powered flight including fuel, starting battery, wrench, and glow plug
clip.
Launching
with an Electric Motor
Many electric powered gliders come with the electric motor and prop assembly
as part of the kit. The only additional items needed would be a battery
(usually two, so you can fly while the other is on charge) and a fast
charger that will operate from your 12V car battery while at the flying
field.