
| Getting To Know R/C Model Aircraft |
Most people find that after they have been to see some flying first hand, they understand that there is a bit more to it than they first thought. It is more than just boys and toys! But, because it will take some time to master the hobby, with the challenge of learning new skills, the effort will make it that much more enjoyable and satisfying. We can assure you this is not a hobby that will easily bore you!
The R/C model
IS a real aircraft which flies and operates by the same principles as
its full scale counterpart. It most certainly is NOT a toy. The only difference
between a model and a full size aircraft is size and weight. Models can
fly at anything from between 10 miles per hour to more than 150 miles
per hour. The average trainer that you will become accustomed will fly
at anything from 40 and 60 miles per hour! This is not slow by any stretch
of the imagination. They require space and lots of it! They should NOT
be flown in any sort of confined area or where unsupervised people may
be. And just like full size aircraft, you have to be taught to fly. You
would not consider going to your local airport and jumping into the nearest
Cessna 153 without a qualified pilot next to you. It is the same with
R/C model aircraft, it is a skill to be learnt.
| How To Start Flying |
The second point
is to get yourself a good trainer aircraft for your first model. There
are many on the market and your club contacts will give advise on what
to look for. Learning to fly is not the time in your modelling career
to try and fly that Spitfire or Tiger Moth you've been fancying.
| Basic Flying Set Up |
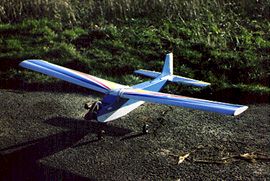
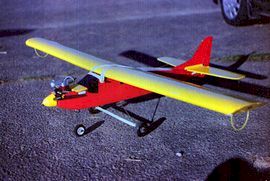
The Aircraft
 Can't
fly without one! As we have already said, you should choose a model that
is designed specifically for training. These aircraft will have a high wing
design, simple but sturdy construction, with excellent plans and instructions.
They are designed especially with the newcomer in mind and are relatively
simply and forgiving to fly. Don't leave home without one!
Can't
fly without one! As we have already said, you should choose a model that
is designed specifically for training. These aircraft will have a high wing
design, simple but sturdy construction, with excellent plans and instructions.
They are designed especially with the newcomer in mind and are relatively
simply and forgiving to fly. Don't leave home without one!
But choosing an aircraft is not a simple as it may first appear. There are so many on the market. Do you want to build one yourself from a kit or perhaps you want to leave the building side of the hobby for a later date? So the decision come down to building a complete kit or just do a simple assembly job with an "Almost-Ready-To-Fly" kit. ARTF as it is usually known. There are lots of acronyms in this hobby, you'll soon get to know them all! ARTF models have most of the construction completed and it will even be covered. Generally the only assembly to be done is joining the wing, adding the tail surfaces, putting in the radio system, engine and undercarriage, then connecting the control surfaces.
The building of
a complete kit from a box of wood and a plan is more difficult, and certainly
takes more time. But it is usually more satisfying. When you build from
a box of wood and plastic, you become more familiar with the aircraft
and the way it's put together and when, yes when the day comes that you
have to do some repair work, you may find it much easier to repair because
you will know how the plane went together in the first place.
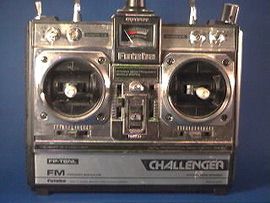
The
Radio
Like the
aircraft, you can't fly without one, unless your into 'Free Flight' models.
But then that is another skill outside the scope of this web site! Most
aircraft radio systems have four (or more) channel capability (see below)
and come with just about everything you need including the rechargeable
battery packs.
 One
thing you may want to look for when buying your first radio is "Buddy
Box" capability. The "Buddy Box" is where two radio transmitters
may be connected together by a cable, the instructor holding one and the
student holding the other. The student can have control over the model
as long as the instructor holds a trainer switch on his transmitter. If
the you gets into trouble, the instructor releases the switch and hopefully
regains full control of the model. This can greatly reduce the learning
time and can also prevent accidents with novice pilots. Check with your
local club or instructor to see if they have "Buddy Box" capability
and if so, you may wish to buy a compatible radio system. Also
ensure that the radio is on the 35Mhz waveband and not anything else.
This frequency band is specially designated to model aircraft in the UK.
Please
read ' Getting To Know R/C Radio Systems'
for more information on the right radio to buy.
One
thing you may want to look for when buying your first radio is "Buddy
Box" capability. The "Buddy Box" is where two radio transmitters
may be connected together by a cable, the instructor holding one and the
student holding the other. The student can have control over the model
as long as the instructor holds a trainer switch on his transmitter. If
the you gets into trouble, the instructor releases the switch and hopefully
regains full control of the model. This can greatly reduce the learning
time and can also prevent accidents with novice pilots. Check with your
local club or instructor to see if they have "Buddy Box" capability
and if so, you may wish to buy a compatible radio system. Also
ensure that the radio is on the 35Mhz waveband and not anything else.
This frequency band is specially designated to model aircraft in the UK.
Please
read ' Getting To Know R/C Radio Systems'
for more information on the right radio to buy.
| Functions, Channels? What's That All About? |
There will be
a number of additional items that you will have to purchase when building
any kit. Most kits supply the airframe of the model but do not contain
such things as the radio system, the engine, wheels, covering material,
and items related to the operation of the engine, such as fuel tank, fuel
tubing, propeller, spinner, etc. ARTF models usually contain most items
with the exception of radio, engine and propeller.
To power your first model, with the exception of a glider, you will need an engine. The most common type of engine for model aircraft is the 2 stroke glow engine. Electric motors and petrol fuelled motors can also be used but are not common in trainer aircraft. Please read 'Getting To Know R/C Engines'.
Field Equipment
There are also a few basic field support items needed when you take your model to the flying field. Again if you starting with a glider then most of the following will be irrelevant. However, for the power flyer the first item you will need is fuel (usually sold in one gallon plastic containers). You will need a way of getting the fuel from the container into the fuel tank. This could be as simple as a bulb fuel pump, a handpump.
 The
second basic necessity is to supply power to your glow plug. A glow engine
needs to have current run through its glow plug before it can start running.
This must be supplied by a 1.5 volt battery or by an adjustable circuit
called a glow driver, usually found on power panels.
The
second basic necessity is to supply power to your glow plug. A glow engine
needs to have current run through its glow plug before it can start running.
This must be supplied by a 1.5 volt battery or by an adjustable circuit
called a glow driver, usually found on power panels.
Additional field support tools should include a prop/glow plug wrench, a "chicken-stick" for flick starting your engine. A Stick is expendable your finger is not! You may also want to take a few other basic tools with you.
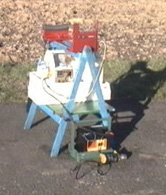
When you go to your local club you will see a wide variety of field equipment boxes. Some have everything including the kitchen sink, while other manage quite comfortably with the bare necessities. Most modellers though will have:
A Power Panel.
A 12 volt battery to power the power panel.
A glow plug clip to energise the glow plug from the power panel.
An electric fuel pump which can be operated from the power panel
Fuel line, filters, and cap fittings for the fuel container to connect to the pump and the fuel tank.
A 12 volt electric starter which can be powered from the power panel.
A 4-way glow plug/prop wrench.
Miscellaneous tools; spare glow plugs; and spare propellers.
A flight box to hold everything.
The level of field support you choose will usually depend on how much you want to spend right away and how far you can carry such a heavy weight while clutch your pride and joy in the other hand.