
![]()
![]()
![]()
![]()
![]()
![]()
![]()
![]()
![]()
![]()
![]()
![]()
![]()
![]()
![]()
![]()
![]()
![]()
![]()
![]()
![]()
![]()
![]()
| More Ideas for the Twister Medevac |
Update:
Upgrading The Twister Medevac Helicopter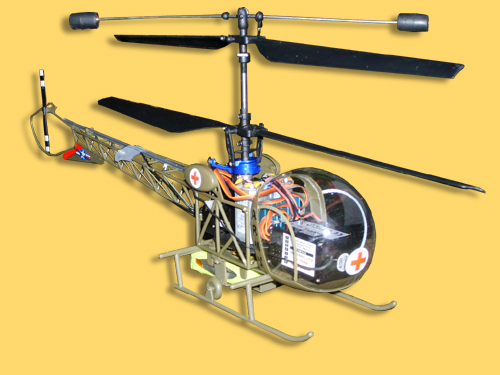
Flybar
It has been suggested in the general forum that you can fly "without". The model does fly with just the rubber ends fitted to the flybar, brass weight inserts only removed. Flying with just the rubbers makes the model a lot less pendulum like.
You see references to the correct installation of the flybar. It does not matter which way you put it in, the arrangement is symmetrical, but it DOES matter how you adjust the link to the blades. The link is actually adjustable and this is not mentioned anywhere. This adjustment makes quite some difference to how smooth the machine flies. To check this out get the Medevac into the air into a hover, a well trimmed heli is required for this.
Look level side on at the tips of the top blade (but keep your distance, wear safety glasses just in case and don't forget to still control the hover!). If you see a shadow of two blade tips running in different planes, you have either a very bad wobble or the link is most likely too short. Put the heli down, remove the link from the blade and lengthen it by half a turn, it has a threaded rod in between the two halves - look closely. Put the link back on. Then hover again and check again for the top blade tips moving in the same plane. If not enough, increase the link length. If it is worse than before, the initial adjustment should have been shortening rather than lengthening. When finished, mark the wing you attached the link to. Why? If you crash the heli and the flybar comes off, you know which way it should go back on.
Would you install it the other way around, you will have to set up the link length again. It will be close but not the same, different enough to make a difference when flying. In case you have to replace a blade, you need to do the adjustment all over.
Motors
Would like to know how you can predict eminent failure of any of the motors. How do they fail? The shop reckons that they just get less ‘torquey’ as they age, which would indicate de-magnetisation or increased brush communation losses (reduced contact pressure). Have you ever pulled a failed one apart?
The motors get too warm for me, especially in the Medevac as shipped form, no heat sink and canopy on. You can tell with the yaw trim throughout a flight what is going on with motors, the lower blade motor gets weaker and weaker, its cooking.
The hotter it gets, the higher the losses, the less torque, the more trim is needed. Compare this with heat sink fitted and no canopy ... a world of difference performance wise, but ugly. I cut with a Dremel grinder tool some fairly large holes into the top and bottom of the canopy, if neatly done hardly visible. Top entry holes are bigger then the bottom exit holes to push the air back over the heat sink and motors. Use masking tape to mark the outline. Motors are as now cool as flying without the canopy. Some people cut out the doors, but I think straight vertical fan forced cooling via the rotor blades is best and would not cause as much turbulence as the sides missing, but haven't trialled this.
Yaw Trim
I ran out of trim options on both settings, 4in1 and transmitter. The lower blade motor couldn't do it (may be it got cooked a little early in the game). I checked the settings on mine against the demo model in the store; a fair bit of trim is typical. To overcome this I cut in the transmitter the left pot end stop track to insert a 1.2kOhm series resistor to make this pot non symmetrical, i.e. a shift of about 10% in the middle (neutral stick). Your normal trim and 4in1 trim is now much more centred.
Throttle Stick
I didn't like the coarse ratchet mechanism either - like some readers of the forum also found out. With a low room ceiling you can’t get it right, next notch too high, the one you are on too low. One suggestion is to disable the ratchet by putting in a plastic sheet to convert it to drag only (see forum). My idea is a bit easier: Take a pair of pliers and just flatten the v-bend very gradually, the flatter the less notching. I do still want some notching to give you feedback when you change the throttle. Throttle response is very subtle, so you want to predict the models behaviour and set it in advance. Like you plan to fly a tight radius with crab, you know you will need, say two notches more pull.
Dislikes
I really hate that the aluminium options come out in blue; it turns the whole optical appearance of the model into a toy. Painted mine black, I'm not sure whether the paint will stick so as I didn't use an etch primer - too much paint will ruin the precision fit. I believe there is a chemical blackener gun people use, I will invest in a small bottle should the cheaper paint option not last, I imagine the blue anodising will need to be brushed of first.
Lights
I put some LED’s on mine for effect, but low light flying is very difficult as you can't see the model's response early enough. Would not like to try total darkness.
Outdoors
Total different experience and I nearly lost mine quick smart. Forgot the rule: Even so you can't feel any wind where you are, there is wind were the model is. It got carried away and before you know it you are out of landing options you can make, and as the distance increases you find out your eyesight used to be better in one's younger years. This heli is too small for outdoor flying, OK for playing in close proximity with absolutely no wind. For this matter you can trim the antenna short, its not needed. Mine goes to the end of the boom on top then on the lower edge back to the skids, there it's cut. The model came with it all wrapped around the boom, knotted, twisted curled to get the 40 inches on, totally useless anyway.
Otherwise I really like it, got me hooked. I'm not so sure whether the step to the next model up (for outdoors) will involve debris (learning money) again. The blades for the Medevac didn't brake the bank.