

| Controling Vibration - Basic Concepts |
 This
article is not intended to be an in-depth scientific analysis of vibration
isolation methods. Instead, it's a guide to some basic concepts that will
help to give you a "gut feeling" for how such systems behave.
This
article is not intended to be an in-depth scientific analysis of vibration
isolation methods. Instead, it's a guide to some basic concepts that will
help to give you a "gut feeling" for how such systems behave.
Vibration - The Photographer's Curse
Vibration is an issue that all aerial photographers must deal with,
whether they use full-size aircraft, or radio-controlled models. In both
cases, there is usually an engine, whose vibrations can easily find their
way to the camera via the airframe, resulting in blurry photos.
While it is possible to reduce blur through the use of high shutter speeds, the result is less latitude with choice of film speeds and aperture settings. Why be forced to use "fast" film that tends to be more grainy and have less contrast? Why be forced to use a wide-open aperture setting that will reduce sharpness? (A lens generally performs best a few stops back from maximum aperture.)
On top of all of this, a vibration, if bad enough, can still blur a photo taken with a high shutter speed. It can also damage your camera. The conclusion: vibration control is imperative!
A Closer Look
How do we deal with it? Professional aerial photographers who use
light planes usually try to make sure that no part of their upper body
is in contact with the aircraft. In effect, they are using their torso
as a shock-absorber.
But you want to do aerial photography from your model, right? The necessary steps to control vibration depend on what type of vibration is being generated. If it's a plane, we are contending with vibration from the engine and propeller (which obviously should be balanced as well as possible). This is a fairly high frequency vibration. At a throttle setting of 12000 RPM, this equates to 200 Hz (cycles per second).
 The
situation with a model helicopter is more complex. The vibration sources
are engine, tail rotor and, worst of all, the main rotor. In a "sixty"
size helicopter, these would be in the vicinity of 240 Hz, 150 Hz and
27 Hz respectively.
The
situation with a model helicopter is more complex. The vibration sources
are engine, tail rotor and, worst of all, the main rotor. In a "sixty"
size helicopter, these would be in the vicinity of 240 Hz, 150 Hz and
27 Hz respectively.
You can see that the main rotor is by far the lowest frequency source. Is this significant? Yes, because low frequencies are the hardest to kill. We can all relate to the problem of getting to sleep when the someone in the building has their hi-fi cranked up, and all you can hear is the bass. Only the bass gets through, because low frequencies are better able to overcome the inertia of mass - in this case, the walls of your room.
Vibration Frequency
The same effects of frequency are noticed when trying to isolate an
object from a source of vibration. Imagine a brick dangling from your
hand via a strong rubber band. Move your hand up and down quickly, and
the brick barely moves. Now move up and down slowly and the brick follows
you. The low frequencies get through more easily.
Softness
Continuing our thought experiment with the brick, here's an important
point: the more flimsy the rubber band, the better the brick is protected
from movement. But it also makes it harder to control. Imagine trying
to carry a brick around using a long thin rubber band! We will revisit
this consideration very soon.
Mass
What if we drastically reduced the mass by replacing the brick with
a sugar cube? We'd find that, with its very low inertia, the cube would
move around very easily. If we want to isolate it from the movement of
our hand, an extremely thin rubber band would be needed.
To summarize these points:
Frequency, softness and mass affect the vibration isolation of the system.
 |
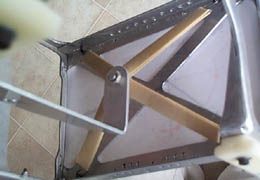 |
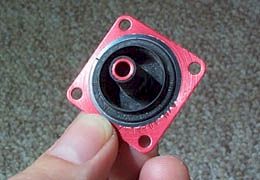
| Isolator (supplier unknown) | One method successfully used by us |
Applying This To Our Situation
Now to the camera. Mount it solidly to your helicopter or plane, and
all the frequencies will get to it. Mount it instead with something slightly
flexible, and you will start to remove the high frequencies. Maybe the
engine vibrations will still get through, but they'll be reduced in amplitude,
and you will have smoothed out the "spikes", that is, the nasty
high frequency harmonics. This is the usual effect of commercially available
engine mounts designed to reduce vibration.
Soften the mount further, and you'll get to the point where the camera does not feel the engine vibration at all! The vibration movements are happening too quickly for the soft mount to transmit them and overcome the camera's inertia.
If it's a plane, then all well and good. A helicopter, as we've mentioned, has additional lower frequencies. We have to support the camera with a soft enough mount that will filter out all the frequencies down to that of the main rotor. This requires a softer mounting method than a plane.
How Soft?
Why not go all the way, and make a super-soft mounting system with
lots of thin rubber bands? This raises an important point. There is a
limit to the amount of softness desirable. The camera will start to swing
about, making aiming difficult and potentially introducing motion blur.
A compromise must be reached. Where is the appropriate compromise? The
answer depends on the camera's weight. For example, someone flying a light
point-and-shoot camera will need a very soft, flexible attachment method
to stop vibration (like the sugar cube). At the other extreme, if you
plan to carry a heavy medium format camera with a pan/tilt/roll mount
and video assist, things are a bit different.
A firmer mounting method will be acceptable, thanks to the high mass and resultant inertia of the system. The extra firmness will also be necessary to prevent the system from swinging excessively (like the brick).
Your next question is probably "Well, how do I know if it's too soft or too hard?"
It's easy to answer. Make it as soft as you are comfortable with, given the need to restrict excessive movement. As a guide, you probably wouldn't ever want your camera equipment to move more than an inch in any direction.
Practical Suggestions
So, how does one actually make a system to isolate a camera from vibration?
Many methods have been used successfully by R/C enthusiasts.
These include:
- A network of rubber straps
- Rubber isolators of varying designs, including those used in the aircraft industry for mounting avionics
- Foam supporting the camera, such as inside a model plane's fuselage
- A circular rubber diaphragm, attached to the vehicle with many screws
in a ring formation, and the camera support bolted to the centre of
the rubber.
The actual design will depend on how much control you wish to have over your camera. For example, if you only want a forward-looking camera, with no pan or tilt, you obviously have a simpler task.
I have even seen cameras taped to aircraft with foam wedged in between! However, such a crude arrangement may carry the risk of losing the camera, or causing injury. This is a good time to point out a safety concern: any system where a camera is attached to a model aircraft must be made to be absolutely safe. It must be impossible for the camera to be dropped. This will often involve a back-up support method such as a safety line.
When weighing up different options, I would be looking at simplicity, elegance, ease of construction, and how much the assembly will weigh. As long as you can keep it safe and reliable, lighter is always better!
Next time I'll be experimenting with an unusual method of getting your camera airborne.
Web Site: HiCam Aerial Photography
(These articles first appeared on the Hi Cam web site
and have been reproduced with the owner's permission).