

| Flight Simms & Spitfires |
Wow, this is my eighth month of doing the Electro Flyer slot - and nearly as many models built as months have passed - is that a record or is it just a very full garage?
 Anyway,
the story as it stands so far, in case you have missed any of my articles.
I
now have my Jiant Jabberwock, 66" span bi-plane powered by a Team
Gear Quad Sport and 36 cells; a 84" span Radio Queen powered by a
Team Gear Scale Twin and 14 cells; a Vic Smeed 1950's designed "Pushy
Cat" powered by a pusher speed 400. A tiny control line electric
powered Cox Spitfire; a Pfalz park flyer; a Team Gear Sport Twin/Single
powered parachute; a Team Gear Mini Single powered "Butterfly Trainer";
a Skyflex.
Anyway,
the story as it stands so far, in case you have missed any of my articles.
I
now have my Jiant Jabberwock, 66" span bi-plane powered by a Team
Gear Quad Sport and 36 cells; a 84" span Radio Queen powered by a
Team Gear Scale Twin and 14 cells; a Vic Smeed 1950's designed "Pushy
Cat" powered by a pusher speed 400. A tiny control line electric
powered Cox Spitfire; a Pfalz park flyer; a Team Gear Sport Twin/Single
powered parachute; a Team Gear Mini Single powered "Butterfly Trainer";
a Skyflex.
I am currently building a Sport Foam Speed 400 powered Spitfire, which is the subject of this month's article. The dreaded Flu struck this month and a combination of that and the work I have been doing on my Flight Simulator Lead for PC's has kept me away from finishing the Spitfire - hopefully the review will finish next month! Then onto the next project …. OH, that's nine!! I have been busy!
There are obviously one or two other models that will also feature in my future articles (hope I'm not being too hopeful at being kept on ED?) such as my 61" Cell Rat which is my "Rat out of Hell" model adapted for the Sport Twin unit. There will be more on the Jiant Jabberwock along with maybe a little about the Dragon Lady 40 and Jabberwock V, both of which are Sport Twin powered. And perhaps even my ¼ scale Extra 300 which has been flow on the Sport Triple but needs the Sport Quad for proper performance.
Where do I put them all? Well, wall brackets to hang them vertically and shelves for the wings works well - a big loft and some hanging off the roof makes things a little easier as well. (Louise proof reads these articles for me and has just mentioned something about wanting to get her car in the garage this winter - what does she means???!!!)
I still have one kit left after the Spitfire and that is the lovely 60" 40's style "Custom Cruiser" which obviously will be getting the Team Gear Treatment - probably the mini twin and 14 cells.
On
To Business.
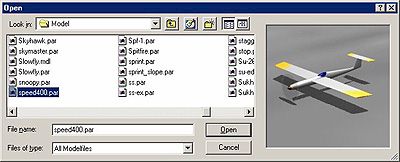 If
you missed my "Shop Front" section last month then just to keep
you up to date I am now making leads so that your buddy socket on your
transmitter plugs into your PC's printer port so that you can use it with
a model aircraft flight simulator called FMS.
If
you missed my "Shop Front" section last month then just to keep
you up to date I am now making leads so that your buddy socket on your
transmitter plugs into your PC's printer port so that you can use it with
a model aircraft flight simulator called FMS.
Since last month this software has moved up a version and now supports transmitters on all Windows platforms. It now has even better graphics and functions and a few new models. I have also been busy finding all the models I can, unzipping and converting to use with the latest version, which even gives you a preview snap shot of the model when you go to select it - and yes, I have made previews of all the models that I have found - 307 at the last count!!!
There
are a lot of electrics here including park flyers, electric ducted fans
and even the good old Twin Star and Piccolo (Plus I/C, Turbines and heli's).
The Lead, which since last month I have supplied for Futaba, Sanwa and
JR transmitters - and will do my best for any TX you have - comes complete
with the CD which now has about 405Mb of files on it and includes the
DOS version, Beta 6 and the new Beta 7, all of the models ready unzipped
and preview files made (I have been given full permission by the creators
of FMS to supply this with my leads - thanks very much to them) is still
priced at £35 plus £1.50 postage - not too bad eh?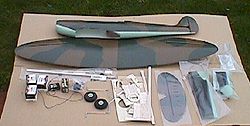
Right
Then - The Spitfire.
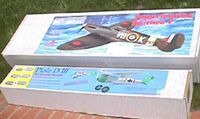
The
Spitfire is made by Astra - now badged as Scorpio. It is 41.5" span
and comes complete with gearbox (add Speed 400, radio, batteries etc.).
It is imported by Ripmax and so is available from myself at £89.99
(if my current price list is up to date!)
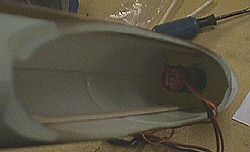
Here are the kit contents (see left) plus the parts I have to complete it. I am using a geared Speed 400, Hi-tec RX and micro servos. Apart from the Rx all the rest came as a job lot with the kit, which I bought second hand - although everything is brand new.
The instructions are very good and clear with plenty of good drawings but, just like the Pfalz, you need to read then all at least twice, look at all the bits and pieces and see how it all fits together with your motor, gearbox and radio gear. Forward thinking can save a lot of heartache.
My other quandary was with the undercarriage. It comes with nice sprung undercarriage and wheels. But I just didn't think it would look right in the air with the wheels hanging down - so they won't be fitted and I will cover any changes that I did to make it safe to belly flop a foamie!
The quality of the components is excellent and the cut wooden parts are clean and precise. The foam moulding also really looks the part as do the vac formed wing fairings, radiators etc.
Let
Building Commence.
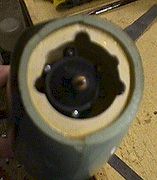 Straight
away I started to do things a little differently to the instructions.
Having read that a circular bulkhead went right in the nose and the engine
mount bulkhead 40mm behind that I felt that it was going to be difficult
to fix the motor and gearbox unit later on so I decided to do it now.
I am also using a speed controller that fixes directly to the rear of
the motor so I needed to know exactly where that was going to be before
I built something in that stopped me being able to fit it in.
Straight
away I started to do things a little differently to the instructions.
Having read that a circular bulkhead went right in the nose and the engine
mount bulkhead 40mm behind that I felt that it was going to be difficult
to fix the motor and gearbox unit later on so I decided to do it now.
I am also using a speed controller that fixes directly to the rear of
the motor so I needed to know exactly where that was going to be before
I built something in that stopped me being able to fit it in.
Good job I did, as the front circular bulkhead has three cut-outs to clear the gearbox lugs - but they didn't - neither did they clear the gearboxs own screws that hold it together. So first job was to clear out the slots to ensure good clearance - I may want to take it out one day!
 That
done it was epoxied in place. The engine bulkhead and its doubler assembly,
with the motor and gearbox fitted, was epoxied in place - no problems
here at all.
That
done it was epoxied in place. The engine bulkhead and its doubler assembly,
with the motor and gearbox fitted, was epoxied in place - no problems
here at all.
Whilst that dried I started work on the wings, just making some cut-outs for the battery box and servo wires. All exactly as per instructions and no problems. The only thing I did not do was cut out the slot for the undercarriage.
Next
day I came to fit the next bulkhead at the rear and found that the grooves
in the sides of the model did not line up at all - about 1/8" out
- so I worked out which one looked right and fitted it there, making sure
that it was square to the fuselage and a little extra epoxy to help as
a fillet where the other groove was.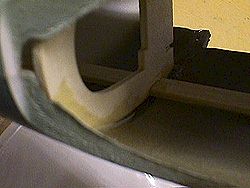
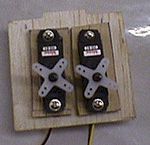
The next stage was to fit the servo tray in the Fuz. Again, this is where I like to do some forward planning. So I decided to prepare it and make sure the servos mounted on it OK before it was fitted into the body.
Although I was using micro servos, the slots in the mount were too narrow and had to be widened. The mount itself is soft 1/8 balsa. The servos are fitted into small 1/8 balsa pieces which then drop on top of the servo mount. Once the pushrods are in and connected you move the servos to zero the control surfaces and glue the one piece of balsa to the other.
 Now
maybe I'm just too cautious but I don't like "fixing" servos
into balsa.(Me neither ! Ed.). So I replaced the servos mounts with light
ply ones to suit my servos, drilled and mounted the servos and then slotted
the main servo mount to clear the servos screws so that I had full movement
to position the servos but everything was secure and solid.
Now
maybe I'm just too cautious but I don't like "fixing" servos
into balsa.(Me neither ! Ed.). So I replaced the servos mounts with light
ply ones to suit my servos, drilled and mounted the servos and then slotted
the main servo mount to clear the servos screws so that I had full movement
to position the servos but everything was secure and solid.
 Well,
that's as far as things have got this month really. I hope to have the
Spit completed by next month and will finish my review then, although
as for flying in this weather I really don't know. I did manage an evening
with the Pfalz in the back garden last week having sorted the gearbox
out - it was just a poor rough shaft that seized it up … all cleaned
and fine now - absolute dream to fly.
Well,
that's as far as things have got this month really. I hope to have the
Spit completed by next month and will finish my review then, although
as for flying in this weather I really don't know. I did manage an evening
with the Pfalz in the back garden last week having sorted the gearbox
out - it was just a poor rough shaft that seized it up … all cleaned
and fine now - absolute dream to fly.
Well as it's windy and raining outside I am going back to my R/C flight sim for now - an easy way to practice handling the Spitfire!
If you have any questions then please get in touch with
Mark at:
ratby@bizonline.co.uk
or check out his web site at:
www.bizonline.co.uk/ratbyaeroplanes