
| Livesey DL5 - The Half Scale Homebuild! (Part 1) |
Clwyd Soaring Association (Read Part 2 Here)
 Everyone
in aviation, whether merely as a hobby or in some professional way, usually
has a favourite aircraft or one that sticks in one's mind, for one reason
or another. For me the DL5 had been in my sub-conscious for some time. As
an active modeller, for some thirty-five years, my brain tends to work twice
as quickly as my hands can build, and my enthusiasm sometimes takes over.
It took some considerable time to actually start putting pen to paper and
produce some working drawings.
Everyone
in aviation, whether merely as a hobby or in some professional way, usually
has a favourite aircraft or one that sticks in one's mind, for one reason
or another. For me the DL5 had been in my sub-conscious for some time. As
an active modeller, for some thirty-five years, my brain tends to work twice
as quickly as my hands can build, and my enthusiasm sometimes takes over.
It took some considerable time to actually start putting pen to paper and
produce some working drawings.
The initial plan was for a quarter scale replica. However somewhere along the line, my sanity went haywire and I ended up with a set of half scale drawings. These were produced by scaling up a three-view drawing, (3"x 5"); from an article written by Arthur Ord-Hume in Aeroplane Monthly way back in July 1973. I tried in desperation to contact the designer David Livesey but after two years of being unsuccessful one evening early in April 1992 armed with "another" phone number I was amazed to hear the words "Hello David Livesey speaking". I was "gobsmacked' for want of a better word. Since that time David has furnished me with further details on the DL5 and from these I have been able to complete the project.
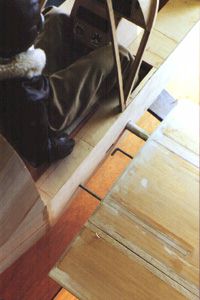 The
main fuselage structure consists of a box section, which is then used
to add the necessary superstructure. This was duly constructed using 1/2"
(13 mm) square spruce and it turned out to be very strong indeed. The
plywood bulkhead and remaining formers were then added. After many calculations,
taking into account the size, wing loading, etc. it was decided that the
King 148 cc. horizontally opposed twin would power the DL5. This was supplied
and duly bolted onto the bulkhead.
The
main fuselage structure consists of a box section, which is then used
to add the necessary superstructure. This was duly constructed using 1/2"
(13 mm) square spruce and it turned out to be very strong indeed. The
plywood bulkhead and remaining formers were then added. After many calculations,
taking into account the size, wing loading, etc. it was decided that the
King 148 cc. horizontally opposed twin would power the DL5. This was supplied
and duly bolted onto the bulkhead.
Construction of the wings, tail plane and fin plus all flying surfaces (ailerons, flaps, rudder and elevator) were manufactured in foam. These structures were reinforced on all leading and trailing edges. Also, spruce spars were inlaid for greater strength. The wings, in fact had two main spars top and bottom and two rear sub spars 1/2" X 1/2" (13 mm x 73 mm) main, 3/8" x 112 " (10 mm x 13 mm) rear). The wing joiner is a 1 " (25 mm) tube 39" (1m) long, fitting into a female tube, which was installed between the wing main spars. An incidence bar of piano wire was similarly fitted on the rear spar position. The wings were held together using a Dural bar under tension.
Obviously, because of its sheer size ordinary modelling methods had to be abandoned and a more full size approach adopted. By this I mean items such as silencers, flying surface connections, undercarriage etc. had to be purpose manufactured and it's always handy to have good friends at this time.
The original undercarriage unit with its very pretty arc shape on the full size was to be constructed of laminations of ash, moulded around a circular former and reinforced with glass fibre. The undercarriage unit on the model needed to be man (or woman) enough to do the job. Some aircraft specification Dural was acquired and this was rolled into shape. Two were made; one to fit inside the other with wooden blocks as spacers between bolts though the assembly. High-tensile steel axles and pneumatic seven-inch wheels completed this important item.
 One
major consideration was transportability. To this end, it was decided
early on to ease this problem. All major components were made removable.
These items are fin/rudder, tail plane/elevator; wing half with flap/aileron
and of course fuselage with removable undercarriage. When the aircraft
is assembled the components form a very strong unit indeed. At this stage
the problem was to cover the airframe in something practical; the criteria
required something with lightweight and good tensile strength. After many
hours of deliberation Profilm was chosen. This is an "iron on"
thick plastic skin, which is pre-coloured and does not need to be painted.
The decision to use this was indeed correct. It has proved to be excellent.
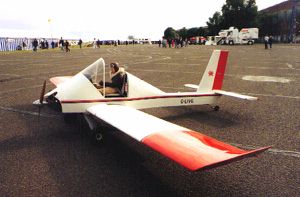
The colour scheme you see here was sent to David Livesey for his approval
because the full size DL5 was never completed! We had no other colour
scheme to follow! I hope you'll agree that this one is simple but effective.
One
major consideration was transportability. To this end, it was decided
early on to ease this problem. All major components were made removable.
These items are fin/rudder, tail plane/elevator; wing half with flap/aileron
and of course fuselage with removable undercarriage. When the aircraft
is assembled the components form a very strong unit indeed. At this stage
the problem was to cover the airframe in something practical; the criteria
required something with lightweight and good tensile strength. After many
hours of deliberation Profilm was chosen. This is an "iron on"
thick plastic skin, which is pre-coloured and does not need to be painted.
The decision to use this was indeed correct. It has proved to be excellent.
The colour scheme you see here was sent to David Livesey for his approval
because the full size DL5 was never completed! We had no other colour
scheme to follow! I hope you'll agree that this one is simple but effective.
The heart of an unmanned aircraft of this dimension is the radio and I decided to use my ever-faithful JR equipment. A failsafe was fitted to throttle and elevator. This would close the engine throttle off and give me 5° of up elevator in the event of any problems. Two 5-cell receiver batteries were used, with selection of the main or backup battery being made by one of the very reliable SM Services battery back up units. This gave the receiver two power sources and if one were to go below a certain voltage the battery backer would select the backup battery. Large size servos were used, one an each aileron, one on each flap, one on elevator, one on rudder and last but not least one on the throttle. Each of the servo leads had a suppressor in the signal wire because of the lengths involved we were taking no chances. My reason for the latter action is to prevent the long leads acting like an aerial and causing the transmitter signal to be disrupted. A third battery pack for the engine electronic ignition was carried (1000mAh pack).
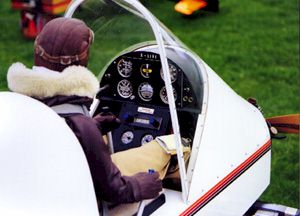 To
complete the electronics pack an anti-collision strobe light was fitted
to the top of the fuselage. This had its own rechargeable power source.
All the switches for the radio system, strobe, engine ignition etc. were
fitted into the cockpit dash in a scale manner with scale size switches.
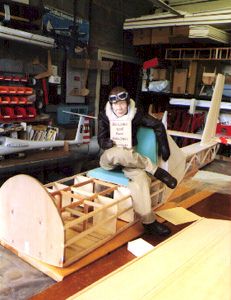
Because of the open cockpit it was necessary to obtain one half-scale
size pilot approximately three feet tall and A. H. Designs came to the
rescue. This item was soon nicknamed "David" for obvious reasons.
"David" was supplied with flying helmet, goggles gloves boots
and an authentic flying jacket.
To
complete the electronics pack an anti-collision strobe light was fitted
to the top of the fuselage. This had its own rechargeable power source.
All the switches for the radio system, strobe, engine ignition etc. were
fitted into the cockpit dash in a scale manner with scale size switches.
Because of the open cockpit it was necessary to obtain one half-scale
size pilot approximately three feet tall and A. H. Designs came to the
rescue. This item was soon nicknamed "David" for obvious reasons.
"David" was supplied with flying helmet, goggles gloves boots
and an authentic flying jacket.
What more could one ask (no it doesn't talk!) The harness was made fully working as we intended to fly the DL5 with video and still cameras on the seat (upholstered of course), so our pilot needed to be removed. The dash and cockpit was furnished on the inside using David Livesey's drawing and a little of my own personal touches. The enthusiasm was now reaching fever pitch. With the aircraft fully rigged, some simple stress tests were carried out with no problems being encountered. My earlier calculations gave me a centre of gravity some 32% from the leading edge of the wing and weight was added to the nose to obtain this position. The King engine had completed about two hours running. This was followed by another three hours in the actual fuselage, the engine was in fact performing better each time its ran. I believe at around ten hours the break in period would be complete.
Next month find out how the Livesey DL5 flys!
(Read Part 2 Here)
Ray Jones
Clwyd Soaring Association